MySql : How to copy records from one table to another

MySql : How to Copy records from one table to another


Mysql is one of the most used databases in the world. It is proved with the number of websites using MySql as their database system, and today, the most popular Content Management Systems including Worpdress, Joomla and many other Blogging Platforms are also using MySql. One reason for the popularity of Mysql is it is Free and Open Source. 

So if you are also working with MySql databases, this blog post will be there to help you someday.

Sometimes you may face instances where you want to copy an entire record of a database table to another table

What I am going to show you today is the way of copying a row of a database table to another using a single Mysql query. This is very useful in cases where you want to take a backup record of a row. If the application you are developing has an option to view the update history of a certain record, you can simply do it with this query by copying the whole row to another table.

Note : For this query to work, both the tables must have same fields. 

Example : 
Here We are considering two tables, 'JOBS' and 'JOBS_BACKUP'. Note that both the tables have the same fields and same properties. In this case, the user is updating the Job which has the ID : 8, and I wanted to take a snapshot of the Job details for the job id 8, as how it was before editing. So later if needed, I have the ability to compare the difference between the two versions, and also I will have all the information I need to check which user has made the update, and when the update was done etc. 

INSERT INTO jobs_backup (
job_id,   
cat_id,
user_id,
start_date,
description,
job_location,
date_created,
last_update,
last_editby,
verified
) SELECT
job_id,
cat_id,
user_id,
start_date,
description,
job_location,
date_created,
last_update,
last_editby,
verified
FROM
jobs 
WHERE
job_id = 8;

As a general query, We can rewrite the above again as :

INSERT INTO table_02 (
field_1,   
field_2,
field_3
) SELECT
field_1,
field_2,
field_3
FROM
table_01 
WHERE
field_1 = 'your value';

I hope this would be helpful to someone who is looking for a way to copy database records in between two tables. Please don't forget to share your comments on this post if this was useful to you :

String Length Calculator Online


String Length Calculator Online


Enter the string to calculate the length:


Thank you for using our free online string length calculator Tool.


What is String Length?

String is a general term used in computer / programming technology to represent a line of text, a word, or may be a several number of characters. We use strings very frequently in programming and other programming related stuff. And also, in day to day life there are many instances where we are using strings, but without much noticing. So as I have mentioned, the length of a string may be sometimes very important. What is meant by the term length here is exactly, the number of characters present in the string. It becomes very interesting when it comes to string lengths because usually as human beings we may only think about the number of readable characters available in a string (a word). But when dealing with a computer, the length of a string is not only the number of known characters, but everything the string is made up of including the punctuations, periods and any other special characters.

Is it important to know the string length?

Yes, many people face instances where they want to know the length of a string. Even in real life, you need to think about the string length since we are dealing with many computer related items. For example, when sending a sms you always think about the length of the message, yeah? like wise, we might face many similar instances in our day to day life.

Why using an online string length calculator?

It is not a mandatory thing for you to use a string length calculator online. But since most of us are using Internet very much, it is really easy and hassle free to use an online string length calculator. Besides, who will like to install a software and waste many minutes when you have the ability to get the string length in two seconds. It is easy as that, just copy, paste and our tool will tell you the length of the string in a second.

Why to use this online string length calculator?

One reason is that using this tool is really simple. All you have to do is copy and paste the string in the above textbox, and click on count button. Our calculator will respond to you with the string length in less than a second. No waiting times until the page submits and reloads, like in most other online string length calculate tools. Everything happens super fast. We use a client side Javascipt function to calculate the string length. This kind of a process is really simple to handle and it doesn't need to sent to a server to process and get the string length. There are many tools I have come across which submits the string to the server to calculate the length.

Is this a Javascript String Length Calculator?

This tool uses a simple client side code in Javascript to process the user input (i.e the string in this case) and give out the string length to the user. Since this tool is created using Javascript, both the user and the server end will have many advantages. The main thing is that it doesn't need to be submitted to the server, and hence the server load is not required. Also since there is no submission to the server, the time taken to submit and reload the page is not accountable to the user, so the user will get the output or the string length immediately.

What is the Javascript function used to calculate the string Length?

Here is the function I have used in this tool to calculate the string length. This is made for my own usage, to calculate the length of a string quickly for one of my recent projects. You can use it as you wish, or you may also create your own one. It is really simple to create a small function like this in Javascript :)


string length calculator calculate string length string online online string length calculator text length calculator word count online calculator text parsing tools string size calculator tools word count word count online tool java script word count online string

How to disable Wordpress plugins manually using database

how to disable wordpress plugins manuallyIf you are working with a Wordpress website, you may always come up with new problems. There is a common problem for most of the wordpress users which is known as “white screen of death” or the blank screen error. When this kind of an error is occurred in a wordpress website, most of the website owners get panic because they don’t have any idea how it happened or how to fix it. So if you would have to face this kind of a scenario, all you have to do is be relaxed, and think how it would have happened. If everything was working fine before, and you suddenly faced this issue, probably it might be due to an error in one of your plugins. One thing you can try is disable all the plugins and try whether the site works normally. This is not the ultimate solution for the White Screen Error, but it may fix the issue most of the times.

Wordpress website owners face many other issues with their plugins. Plugins which were working properly may start to malfunction suddenly and sometimes when the problem becomes worst, the admin login will also be blocked due to the error. So in this article I am going to talk about how you can disable your plugins without accessing your worpdress admin area. I will show you how you can disable all the plugins at once with a simple query, like explained in this article (which inspired me to write this article.) and also I will show you how you can disable a single plugin. (This was not discussed in the above article). Since this single plugin disable method was not discussed in that article, I wanted to write my own and keep the Blog readers updated about the method.

You should keep this page bookmarked because I know you will definitely need this someday :) (If you are using wordpress, or intended to do so in future.)  So keep reading, and come back when you will have to face this issue: D

Let’s start...

What we are going to do here is enter into our Wordpress database, and delete the particular record for plugins so that all the plugins will be disabled. This can be done using any mysql management software, or simply by using the PhpMyAdmin which comes with your Cpanel installation.

First connect to your wordpress database using any of the methods above. Then you have to run the following query to select the plugins which are already installed in your wordpress website.


SELECT * FROM wp_options WHERE option_name = 'active_plugins';
The ‘active_plugins’ field may contain a large string similar to the below, depending on the plugins you have installed.

To make things easy, copy the whole string and paste into a text editor (notepad, notepad++ or whatever you like).

Now, if you want to disable all the plugins you have installed, simply make the ‘active_plugins’ field blank by deleting its content, and save it. 

You don’t need to be scared to delete this value, because deleting the value in this field doesn’t make your plugins disappear forever. They will only be deactivated, and you can re-activate them back by logging into the Wordpress admin area. 

By now, you have successfully deactivated all the plugins manually, and everything should be fine, and you should be able to login into the admin panel if the problem was with one of your plugins.

If you could log in, then it is clear that one or more of your plugins are not working properly, you can find the malfunctioned plugin by re enabling all the plugins one by one.

Now let’s see how you can disable a single plugin using the database. So as I explained above, I have run the query on my Wordpress website, and copied the content in the active_plugins field to here.

This is what I had in my ‘active_plugins’ field. 

a:9:{i:0;s:24:"blog-icons/blogicons.php";i:1;s:45:"bulletproof-security/bulletproof-security.php";i:2;s:23:"digg-digg/digg-digg.php";i:3;s:17:"kayako/kayako.php";i:4;s:19:"pictips/pictips.php";i:5;s:56:"slick-social-share-buttons/dcwp_slick_social_buttons.php";i:6;s:31:"what-the-file/what-the-file.php";i:7;s:41:"wordpress-importer/wordpress-importer.php";i:8;s:24:"wordpress-seo/wp-seo.php";}

To make it more clear, I have rewritten the same in new lines below;

a:9:{
i:0;s:24:"blog-icons/blogicons.php";
i:1;s:45:"bulletproof-security/bulletproof-security.php";
i:2;s:23:"digg-digg/digg-digg.php";
i:3;s:17:"kayako/kayako.php";
i:4;s:19:"pictips/pictips.php";
i:5;s:56:"slick-social-share-buttons/dcwp_slick_social_buttons.php";
i:6;s:31:"what-the-file/what-the-file.php";
i:7;s:41:"wordpress-importer/wordpress-importer.php";
i:8;s:24:"wordpress-seo/wp-seo.php";
}

If you read the above code carefully, you will notice that the number after the letter a:, is the number of plugins I have installed. It is 9 in this case. (You can count the number of lines.) And also, you can understand that each of the lines represents a plugin, and by the name mentioned in it, you can identify what plugin it is.

Suppose I wanted to disable the Worpress Seo plugin. It is the last one in my list. Now I will rewrite the list by removing the SEO plugin from the list as below.

a:8:{
i:0;s:24:"blog-icons/blogicons.php";
i:1;s:45:"bulletproof-security/bulletproof-security.php";
i:2;s:23:"digg-digg/digg-digg.php";
i:3;s:17:"kayako/kayako.php";
i:4;s:19:"pictips/pictips.php";
i:5;s:56:"slick-social-share-buttons/dcwp_slick_social_buttons.php";
i:6;s:31:"what-the-file/what-the-file.php";
i:7;s:41:"wordpress-importer/wordpress-importer.php";
}

I have deleted the last line, which was the line representing the SEO plugin, and also note that I have made the number in the first line to 8, which means one plugin is removed from the total number of plugins I had. Now I will paste this back into active_plugins field and I will save it.

That is it. Now you have learnt how to disable a plugin using the database. If I log back into the admin panel, I will see that the SEO plugin is disabled, and I can enable it anytime if I want. Also you do not need to worry about anything because all the data saved by the plugin will also be preserved.

Please leave your comment or idea about this article because it will be helpful for me to develop this blog.

This article is about how to

Disable Wordpress Plugins manually


People used following queries to reach this article.
how to disable plugin in wordpress database
how to disable plugins in wordpress manually 
how to disable plugin in wordpress database
how to disable plugin in wordpress
how to disable plugin updates in wordpress
how to remove wordpress plugin from database
how to remove wordpress plugin manually
how to remove wordpress plugins


How to add breadcrumbs to a BlogSpot Blog

how to add breadcrumbs in blogger
Today I am going to share the way of adding breadcrumbs to your BlogSpot blog. Before we start, I should make it clear that what I am going to share in this article is not the way how you can add breadcrumb navigation to the blogger blog, but what I am talking about is how you can enable breadcrumbs in your BlogSpot blog, so that Google will show the Blog’s breadcrumbs in Google search results.


What is breadcrumb Navigation?

“Breadcrumbs“ is a special term used in web development to introduce a new type of a navigation method available in modern websites. We know how much it is important to have a well organized navigation system within a website for the usability. People like you and me are looking for fresh and new content all over the internet. Similarly, that is the common purpose of all the other internet users as well. Breadcrumb navigation is introduced as a solution for easy navigation, and also to make a website more structured, so that the visitors will easily understand the content of the website / blog.

As mentioned above, the purpose of the breadcrumb navigation is to categorize the content into general categories, so that each section will contain all the similar content, making it easy for the visitor to navigate in between categories or articles.

how to add breadcrumbs to blogspot

If you noticed the underlined urls in the above image, that is how the breadcrumb navigation appears in your BlogSpot blog.

Though I have specifically mentioned that what I am showing you in this article is not the way of adding the breadcrumb navigation to your BlogSpot blog, this method will automatically implement the navigation inside your blog as well. But then, if you wonder why I have mentioned like that, the reason is simply because it will depend on the template you are using, so I cannot guarantee that it will work as it is. But it should work without any problem unless your template designer has not omitted it from the template.

So coming back to the topic, we were discussing about what breadcrumbs navigation is and how it will appear in your BlogSpot blog. Moving a little further, if you think you should dig more about breadcrumbs navigation, here is the detailed article in Wikipedia for breadcrumbs. if you really want , You can read  it and come back :)

Now, the question,

How to add Breadcrumbs in Blogger?

There is no special option given for adding breadcrumbs navigation to your BlogSpot blog in the blogger’s blog management area. Also there is nothing mentioned about breadcrumbs in the blogger admin panel. Then how to do it? Don’t worry. It is really simple.

Enabling breadcrumbs in BlogSpot blog is not a difficult thing. As I have mentioned above, what breadcrumbs does is that, it categorizes the content of your blog.  If you still haven’t used categories for your blog posts, then you won’t be able to see breadcrumbs yet. So first of all, you have to decide how your blog articles can be categorized. It is very important that you categorize the blog posts in a way so that a category will have articles about that specific category only and nothing else. If you messed up the categories and put your articles here and there without any proper planning, your visitors will face difficulties in the navigation, and also the search engine bots. 

When you are done with the initial planning, you can start adding labels (categorize) to your articles as you selected. Also you should remember to add the proper label every time when adding a new blog post to your blog. (Forgetting to add a label by the time of posting the article doesn’t make any harm. You can always add or change the category by editing the article. )

Follow the steps given below to add / update the label of a blog post in blogger.

01. Go to ‘Posts’ (It is in the navigation bar to the right in the blogger admin area. The second option from top).
02. Then you will see a list of all the articles in your blog.
03. Select the article which you want to update the label / category, and hover the mouse over it. You will see a menu will appear just underneath the article name. Click on ‘edit’ option in the menu which appeared.
04. Then you will be redirected to the edit article page where you will have the options to update the article content.
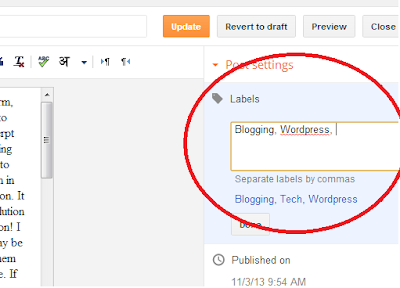
05. On this screen, to your right hand side, you will see an options menu as in the image below.

how to add breadcrumbs in blogger to gain seo advantage

06. There, on very top of available options, you will see an item named as labels.
07. Click on it and it will open you a textbox to edit the label for the blog post you are editing at the moment. 
08. You can type the name of the label you want this article to be included in, and click on done button. Then click on Update / Save button to save the changes.

blogger breadcrumbs navigation

If you have successfully followed the above steps, you will be able to see the breadcrumbs navigation is appearing in your blog now (depending on the template you are using). 

Once you have enabled breadcrumbs navigation in your blog, Google will understand your blog’s navigation structure and it will naturally include the breadcrumbs in the search results. This may take up to a week, depending on the Google bot’s crawl rate of your blog.

And this is how the breadcrumbs appear in Google search results.

Google breadcrumbs in blogger

This is one of the many benefits you are getting by using blogger as your blogging platform, because if you wanted to implement this breadcrumbs search results for a custom website, you will have to do a lot of stuff with adding a whole lot of markup codes to your webpage. But in blogger, all you have to do is just adding a label to your article, and Google will automatically detect breadcrumbs. Even in Wordpress, you cannot implement breadcrumbs this much easier. But luckily, there are many plugins available to do this task without needing to open the scripts to include the codes by you. But still, there is some level of work you need to do in order to get the breadcrumbs to be appearing in Google for a Wordpress blog.

Further Note: If you are wondering why you should add breadcrumbs to your blog, here is my answer.  Having breadcrumbs enabled in your blog will not help you to rank higher in Search Engine Results. But again, in terms of usability, the breadcrumbs navigation makes it easier for visitors and search engine bots to move easily in between different sections of the blog. And as a result, the more and more visitors will come to your blog because they will feel comfortable using it over other blogs. So it is a good idea to add it as soon as possible :)

People used following search terms to find this article.

how to add breadcrumbs in blogger

how to add breadcrumbs to blogspot

how to add breadcrumbs in blogger to gain seo advantage

Online URL Encode Decode

Online URL Encode Decode


Enter the URL to Encode / Decode:


Decode URL or text
Thank you for using our free Online URL Encode Decode Tool.

What is URL Encode?


URL encoding is a simple encryption method which converts the html characters into their special entity codes. Sometimes when you are copying a link from a website or a webpage source, the URLs may me encoded, and if you copy it directly, you may not be able to download a file or visit the URL. But with our new free Online URL Encode Decode Tool, you can easily encode / decode urls within a second.

Why to need to use this Online URL Encode Decode Tool?


There are many free tools there, and it is no special reason to use our URL encode Decode tool. But our encode and decode processes are super fast. You do not need to wait until the page loads to get the Encoded or the Decoded result. Just Copy the URL, Click on Encode Decode button, and you will get the result just in a click of a button.

How our Online URL Encode Decode Tool Works?

Our URL encode decode tool is pretty simple, and we use a client side Javascript Script file to execute your URL inserted, and convert it on the fly.

How to change Excerpt length in Wordpress

change excerpt length wordpressIf you are using Wordpress as your blogging platform, there may be a common and an annoying problem to you. It is the popular question “how to change excerpt length in wordpress”. Yes, that’s why you are reading this :) I have good news for you. You will not have to worry about how you can change the excerpt length in wordpress anymore. Here I have brought the solution. It is super easy. If you are in a hurry, and want the solution immediately, Click here to Jump direct to the solution! I know all my readers will not be the same. Some may be having the problem, and some may not. But all of them are reading this article. So I am writing for everyone. If you are just curious about this Wordpress issue, please keep on reading :) So as I said, sometimes you may never have had this problem before. And you may even have no idea about Wordpress. That’s not a problem. If you want to know what I am talking about, you are also welcome to keep reading.

So, what is Wordpress?


Ok, Wordpress is one of the most popular CMS (Content Management Systems) being used by many web developers to build blogs and websites. Wordpress is so user friendly, that even a person who has no knowledge in Web Development also can easily manage a website by himself / herself.


What is an excerpt? Where the excerpt is located?


Excerpt, by the meaning of the word itself, the excerpt means an extraction of a piece of text from your blog articles. Simply, it is a small selection of the content within your blog post. Excerpts are located in the Blogs page of your Wordpress blog. When you check the blog page of a website, you can see the titles and a small paragraph under each of the titles, with a link to the Full Blog Post. This small paragraph is called the excerpt.


Why you need an excerpt?


Personally I think it is very much important to set up a blog with excerpts. The reason as I am seeing is, a Blog is a place which gets updated frequently with fresh contents. Then it is obvious that many people are visiting the blog to read the articles. If you are displaying the whole article content without excerpts, and you are having 05 blog posts per page, the page is going to be very lengthy, causing the page to load very slower. Besides, the visitors may be interested in different topics, and they may be seeking the right article for them. If so, you are going to lose the readers. Nobody is going to read lengthy articles just to find whether it matches their interest or not. But simply by having a blog post page with excerpts, you can display many number of blog posts in a single page. Also it will reduce the page load time. And also it makes easier for people to find the right article by reading the title and the excerpt only.


What is the problem with the current excerpt length in Wordpress?


If you do not have any problem with the current excerpt length, then everything is OK. But the most common problem people having with the Wordpress excerpt is the length of it. By default, the Wordpress excerpt length is 55 words. Some people find this too lengthy and some finds it is very short. Whatever the condition you are in, you can change the excerpt length as you wish. Being too short, the excerpt makes the page looks emptier. On the other hand, being too lengthy will make it appear more crowded, and it will also make the content unclear for the visitors. So you must be careful when selecting the right excerpt length for your blogs. First experiment with few variant number of words and come to the final value. It will help you to increase your page views as well.


How to change the Wordpress excerpt length?


The only option available at the moment for this is through editing the source code. Wordpress development team has not included an option within the admin backend to change this value. But it is not a problem at all. You can do it yourself. Just Go to your template Options, and Click on Edit Files. Then under that, on the right hand side (most probably) you will see the list of files being used by the template. Scroll down and select “functions.php” file. Click on it so that it will be open in the text box for you to edit. Then simply paste the following code within the functions.php file. And you have done changing the Wordpress excerpt length.

function custom_excerpt_length( $length )
{
 return 20;


add_filter( 'excerpt_length', 'custom_excerpt_length', 999 ); 

Be sure to paste the code as it is, and
then change the values accordingly. All you need to do is change the above ‘20’ value to the number you want. Also make sure you are pasting the code within the php tags.
Warning: It is always advised to get a backup of the files you are editing so that you can replace it with the original file if anything went wrong. In the meantime, it is highly advised to always do the editing of files through FTP. In case you have made any code incorrect, there is a possibility to get the site to halt working. If you are unsure about what you are doing, please seek the advice of a person who knows about using FTP, coding etc. This is for your own good :)
I hope you enjoyed reading the article. Please leave your comments and ideas about this article, whether it was useful, or have you learnt anything from this. Also please add a comment if you need any help in changing the above codes.

The Best Social Sharing Plugin for Wordpress!

Best Wordpress Social Sharing Plugin
Wordpress....You Wanna be Social?
Today I am going to introduce you the Best Social Sharing Plugin for Wordpress. There is no doubt that Wordpress is the best Open Source Content Management System (CMS) available today. The main reason for its popularity is the ability to use Wordpress for any kind of a website. It can be used either as a simple Blog or as a complete Website. All you have to do is change few values in the admin area. This special ability has made many webmasters to shift from their old custom developed websites to Wordpress powered websites.  Wordpress gives you easy control of your website in a single place from creating pages, creating blog posts to managing the SEO tasks.

If you are using Wordpress, you may want to read this article which I wrote about a security measure in Wordpress titled Wordpress Hacking.

OK. Enough talk about Wordpress? Yes, let’s jump to our topic.

So today I’m going to share one of my experiences with an awesome Wordpress plugin, which will be really helpful to make your Social Presence Strong. Social Media Marketing or promoting your content over the Social Media is an essential task today when it comes to SEO. That is because our big brother Google has fallen in love with Social Networks a few years back and they wants us to engage more in social media :) So I am here today to introduce you a nice plugin for that.

I guess you may have already tried several plugins to insert a Social Sharing Widget in your blog / Website to increase Social Media Shares and end up with finding a bug or some mistakes in the plugin. That was the same scenario for me as well. I did a lot of research to find out the best plugin that will fit my requirement, which was really simple. I just wanted to insert a social share buttons in my Posts and the Pages with the exact Shares, Likes, Tweets or whatever the counts. Most of the Plugins failed to accomplish this simple task.

But, at last I found this awesome plugin called Dig Dig. It was really good that I could remove all the other plugins I already had for Social Sharing.

Dig Dig plugin is absolutely a nice plugin, but nobody is perfect yeah? I found a few bugs in it too. Actually they were not accountable when compared with its nice appearance and the user friendliness. Actually the fault was with my template. Dig Dig was not working smoothly with my template, but still it was quite good though I had several problems with alignments.

The plugin provides two main alignment options as in the other plugins, basically as floating menu, or as a Horizontal bar. When compared to other plugins I have used, Did Dig gave me the actual counts as soon as my likes got increased. The other plugins that I have been using were not updating or not showing the real Shared count. So as a whole, I think Dig Dig is a nice plugin, and that has made me write a good review about it.

If you came here looking for a Wordpress plugin for Social Sharing, I recommend Dig Dig for you. You can install it and try whether it matches your requirements. Why we really drop many great plugins is that the requirements of each of us are different. The main idea is to add a Plugin to display some Social Sharing buttons in our Wordpress website along with the Social Sharing counts. The developers may have already done it. But they are not targeting the usability. If the Dig Dig developers also can target more on usability of the plugin with some major Wordpress templates at least, it will reach to the number 01 plugin for social sharing in no time.

I would really appreciate if you could share your experiences with the other readers because that will be helpful for all. Sometimes I may be wrong. You may have found many mistakes in the same plugin which I have discussed here, or you may know some other great plugin than what I have mentioned. So you have a whole lot of things to Say...I am very happy to hear from you :)

Happy Wordpressing :D

This post is about

Social Sharing Plugin for Wordpress

Wordpress Latest 2013 Hack vulnerability!

wordpress hack 2013This is 2013, and it is Wordpress 3.6 by the time I am writing this..So, do you really need to care about this topic??

If you are using Wordpress, yes you should…

I wanted to write this and share one of my bad experiences with Wordpress, and this time it was really touching me.

This happened to me in the last week. I had to use Wordpress to create a web site for one of my friends and together we uploaded wordpress and setup everything nicely. Within less than an hour, we had a fully functional website with all the content management requirements he needed. That is all because of this powerful and elegant CMS, Wordpress. I knew that wordpress is the best option to select when I heard my friends requirements. But we never thought about the vulnerabilities in wordpress. (Though I had some previous bad experiences). It was because I thought that all the bugs would have fixed since this is the latest release of Wordpress. Let’s see what happened :)

So, by this time we had a nice Wordpress website, and we wanted to give it some more attractiveness, and my friend decided to buy a template from a popular Worpress template seller. It cost him just only less than USD 10. It was a very nice template and it had many useful options to edit and customize the template and to manage the content.

He was really happy about the final result he got, and the rest of the day we worked on adding content and planning on optimizing the pages and content.

On the next day, while we were cross checking the site, we noticed some unusual thing on the site. Some pages appeared to be hacked. And no sooner, the other pages was also got hacked. The only text on the page was “Hacked by {some hacker guy’s name}”. We were shocked, but acted very fast and put the site offline immediately. I should mention that my friend’s website was already a popular one, it’s PR was 04. He had some good traffic by that time as well. So we had no much time to keep it offline, since it doesn’t make any good.

I took a backup of the hacked Wordpress website to analyze later, and I restored the original files into the server. The site was setup back to its original status. But still the threat was there. Hence I started to work on finding a solution for this.

What I initially did was I went through all the hacked files looking for a clue for the backdoor. When I opened the templates folder, I realized that all the template files have been hacked. The hacker has edited the files and put his phrase in each of the files.

I was wondering how it happened……..

Then I opened the wp-config.php file, and it was the spot which I noticed how the hacker has got in. Somehow, this hacker has got access to the Wordpress config file and edited it, so that he could get the database details from it.

Then using those details, he changed the admin password and logged into the admin panel, and has changed / edited all the template files.  That was so tricky. Anyway I couldn’t figure it out how the hack was done, and I neither cared about it. All I did was blocking the hacker from accessing our important Wordpress files.  

Once I realized that it was done through the wp-config file, I blocked direct access to that file using .htaccess. and it protected the site from that hacker. We looked for another few days whether the hacker will come and hack it again. But it didn’t happen again. So we decided we are safe.

I learnt a very good and a very important lesson after this incident. Wordpress is really nice because it has all these content management ability and the vast amount of useful plugins. But still, Wordpress is so vulnerable to hacks. As I noticed, it was not a direct fault of Wordpress. The backdoor was opened as a result of the template which my friend used. So it is very important to think before you install any third party template or plugins in your Wordpress website or the blog. Use plugins which you can trust. And always read the good and bad reviews about it. It will save you from unexpected hacks or attacks.

Finally, If your Wordpress website got hacked, never get panic! It is so important that you keep calm and work on a solution to fix it. Also do not trust on Wordpress very much. Always apply your own ways of protection to it. Specially protect your wp-config.php file using a htaccess.

Thank you for reading my article. Please do not forget to share your thoughts on this. I know you definitely have something to say about wordpress :)

Happy and safe Wordpressing :D


Wordpress hacked fixing

Optimize your Blogger post titles for better SEO today!

Introduction…

Blogger is a popular blogging platform which provides a decent service for bloggers for free. But unfortunately it lacks many important things when it comes to SEO. Unlike in Wordpress, the blogger platform seems not much focusing on SEO. Hence this article is explaining you how to optimize your blog post titles to attract more visitors through search engines.

Maybe blogger is SEO friendly or not, but we all love using it because it is very easy manage your blog even you are a new to blogging.


Luckily, we have our own ways to make our blogs optimized for search engines. Let’s see how J

What’s missing?

If you are a serious blogger, you may have already noticed that blogger article titles are not very SEO friendly.

If you have not seen it yet, just open your blog and look at the title bar.

Yes, you are right. It first shows the name of your blog, then the title.

Ex: Your Blog Name | The title of your article with some valuable keywords.

The title is very important since it gives the whole idea of your article. So the visitor should notice it first.

After this little trick, you will have a blog with nicely optimized titles  J

Like this…..

Ex: The title of your article with some valuable keywords | Your Blog Name


How to do it?

It is really simple.

Log in to your blogger account.
Select ‘template’ from the menu in the sidebar to the left.

Then click on Edit HTML.

Remember, you should always keep in mind to get a backup of your original template before attempting to do any changes. It will help you to get rid of any disasters that can happen if you make any mistake in your Template.

If you do not know how to take backups, read this post. Click Here! I have explained it in details and with snapshots.

Now search for this tag: 


<title><data:blog.pageTitle/></title>

(Click inside the codes box, and press ‘Ctrl + F’, then type “<title><data:blog.pageTitle/></title>”without quotes and press enter.)

Then replace the above line with below code.

<b:ifcond='data:blog.pageType == "item"'>
<title><data:blog.pageName/> |<data:blog.title/></title>
<b:else/>
<title><data:blog.pageTitle/></title></b:if>

That’s it. Save the template.

Now you should see your new optimized titles J


The Story of Gmail’s new tabbed interface


If you are using Gmail daily, this is not a new thing for you. But few days ago, Google introduced a new tabbed interface into the Gmail accounts, and this post is all about it.
If you are not familiar with this new interface, you might get a clear idea about it after reading this. So keep reading :)

The Old story…………..

We know that, Gmail was started as a service by Google to overcome the problems we had with other email service providers like Yahoo & msn. They were the most popular email services before the arrival of Gmail. The main problem of these old services was the space they provided. It was a very little amount of storage and users had to keep their inboxes cleared to welcome the new emails. Then Google introduced their new product, Gmail. They promised that they will provide unlimited storage for their users. But by now they offer only 10 GB of free storage, and it is comparatively a fair storage for nothing (I mean for free :D).

Why is it?

What I wanted to tell you was that Gmail / Google always introduces new things to help their users. This new tabbed interface also the same. Since emails have become an essential part of our day to day lives, it is important that we do not miss any email because each and every email will be useful most of the times. Hence Gmail has come up with this new interface which will bring you a clean and a well organized inbox.

How it works?

Gmail will automatically add 3 tabs (by default it has 05 pre generated tabs) to your inbox as Primary, Social, and Promotions. Other two are Updates and Forums, and they are not activated by default.

The Good news is that if you do not like this tab thing you can always hide them.


Why I need those tabs?

OK, be cool….They will just filter your emails in the inbox. Don’t worry…all your mails are there. Read the below lines and you will find exactly what it will do for you :)

Primary Tab: the mails you usually receive from other people, especially from the people you know by the name of the sender will be included in this tab. (to be exact, the emails you receive from an individual. Cool. Got it?)

Social Tab: I know, we all are social addicts, maybe either Google+, Facebook, twitter or anything else, we all use them. But what’s the bad with them? Yes they do send emails daily. Yeah? Personally I don’t like this type of emails. The problem is now solved. Those mails will directly go to the social tab.
See how easy? Now no more hassles choosing the important mails…

Promotions Tab: If you have subscribed to any mailing list, you may already have experienced the spam-my type useless mails (most of the times they send crap.)
No problem, now you don’t need to worry about them. Gmail will filter them for you.

Updates Tab: This tab will filter emails which are in the type of confirmations or receipts or bills. Say if you have registered for a website, and they want you to reconfirm your email address. You will get en email from them. So this is an important tab. If you have not activated this tab, the emails in this category will be shown in the primary tab.

Forums Tab: This is similar to the above Promotions tab, but this includes the emails from Public Forums, or Group discussion boards which you are engaged in.

How to use the tabs?

Well, actually you don’t have to do anything. Gmail will handle everything for you.
But still if you need any email to be shown in a specific group, you can drag and drop the email to the tab you need. Gmail will ask you whether you need to follow this action for the future mails from this sender. 

Click on yes.

It is simple as that.


To manage the tabs, click on the + icon next to the tabs. It will bring up the options box. Or click on the settings button (the toothed wheel icon on the top right corner), and click on “Inbox Options”. It will also open the same options window. To make any tabs hide or visible, just use the check box to tick or un-tick the tab. To completely hide the tabs, un-tick all the check boxes and click on save button. (You can’t un-tick the primary tab, but it will not be shown if other tabs are not selected).


Inbox options window


Summary.....

Gmail introduces all these features to enhance the experience of its users, and hence to increase the user friendliness. Ultimately, it is an important factor for any product, maybe it is either an Online or an offline product, the user friendliness is still important. So do you think this feature of Gmail will be helpful? Or have it been already useful to you? 

Leave your ideas for others…….

Create a related Posts Gadget with thumbnails for blogger.

Have you ever wanted to add a gadget to your blog that will keep your readers really busy reading your posts?

Yes, I know you wanted!! That is why you are here and reading this J

OKKK……no problem….we all want our visitors to read as much as content we write. The best way to do this is by adding a relative posts gadget to your blog.

I am showing you a way to create your own gadget to show similar posts after each of your blog posts. And remember…. this will work with Blogger ONLY!!!!

Cool.

Here we are just adding some codes to our blogger template. So it is very important that we should always backup out template before we do any changes. In case of any mistakes happened by you and went anything wrong, you can just replace your template. So you don’t want to worry too much.

First let’s see how you can backup your blogger template.

So go on and log into your blogger account. Select your blog. Then go to template menu option in your right hand side menu.

After that you will see a button in the upper right corner of your page. (See the image below)


After you click on it, you can use the “Download full template” button to download your template (it will be xml file).

So once you have taken the backup, you can move forward with editing your HTML.

Now click on Edit Html button as shown in the above image.

Then press “ctrl + F” (to open find menu), and type “</head>” (without quote marks) in the “find” field and press enter to locate it in your HTML code.

After that, paste the following piece of code just above the </html> tag you found inside your code.


<!--Related Posts widget for blogger Start-->
<!-- remove --><b:ifcond='data:blog.pageType == &quot;item&quot;'>
<style type='text/css'>
#related-posts {
float:center;
text-transform:none;
height:100%;
min-height:100%;
padding-top:5px;
padding-left:5px;
}

#related-posts h2{
font-size: 18px;
letter-spacing: 2px;
font-weight: bold;
text-transform: none;
color: #5D5D5D;
font-family: Arial Narrow;
margin-bottom: 0.75em;
margin-top: 0em;
padding-top: 0em;
}
#related-posts a{
border-right: 1px dotted #DDDDDD;
color:#5D5D5D;
}
#related-posts a:hover{
color:black;
background-color:#EDEDEF;
}
</style>

<script type='text/javascript'>
var defaultnoimage=&quot;https://blogger.googleusercontent.com/img/b/R29vZ2xl/AVvXsEijVLm0IUOjD3r31vdUuk-L4ANbO3EDegXNpm3093PJZcgZN4U5r9iTQSS6h6IZRTr3VJgt-rUVCETzR5TQSSXawcth3z9-b042_Xz09faPHiX4ejLFnw0GVRqkC6BZE4QxzvEVQrlAoiaT/s1600/no_image.jpg&quot;;
varmaxresults=5;
varsplittercolor=&quot;#DDDDDD&quot;;
varrelatedpoststitle=&quot;RelatedPosts&quot;;
</script>

<script src='https://avdhootblogger.googlecode.com/files/avdhootblogger.relatedpostwidget.js' type='text/javascript'/>
<!-- remove --></b:if>
<!--Related Posts widget for blogger End-->


Now find for the below piece of code,


“<div class='post-footer'>”


Then paste the below code just above it.

<!-- Related Posts widget for blogger Start-->
<!-- remove --><b:ifcond='data:blog.pageType == &quot;item&quot;'>
<div id='related-posts'>
<b:loop values='data:post.labels' var='label'>
<b:ifcond='data:label.isLast != &quot;true&quot;'>
</b:if>
<script expr:src='&quot;/feeds/posts/default/-/&quot; + data:label.name + &quot;?alt=json-in-script&amp;callback=related_results_labels_thumbs&amp;max-results=6&quot;' type='text/javascript'/></b:loop>
<script type='text/javascript'>
removeRelatedDuplicates_thumbs();
printRelatedLabels_thumbs(&quot;<data:post.url/>&quot;);
</script>
</div><div style='clear:both'/>
<!-- remove --></b:if>
<b:ifcond='data:blog.url == data:blog.homepageUrl'><b:ifcond='data:post.isFirstPost'>
</b:if></b:if>
<!-- Related Posts widget for blogger End-->


If you found more than one “<div class='post-footer'>” in your code, you will have to the paste the above code for each of them.

I hope you will try this out and let me know your comments.

If you need any help for the above, please feel free to send me an email.


Vuescan Cracked (Professional) version

Update Notice : 23rd August 2014. 
If you are looking for the latest fix to remove the watermark, please check my new article written on 14th Aug 2014. It was written for the latest cracked version of vuescan, and includes a download link.

Link Here : How to remove Vuescan watermark – Vuescan 9.4 Crack Version 


Update Notice : 15th January 2014. This article was updated and added a direct link to download the Vuescan Cracked Version as many readers complained me that I have not provided a link to download the software.


Vuescan crackedRecently I wanted to scan a few of my urgent documents and I tried to connect my old Epson scanner to the laptop. Then I understood that I have been using the scanner on my old desktop computer which was running on windows xp, and it no longer supports my current version of windows in my laptop (Window 7) actually there was no driver available for windows 7 64 bit from Epson

So I had to get the help of Google, and I found this Software “Vuescan Professional Edition 9.2.”. It looked fine and it was just only around 08 MB. So I downloaded it and opened and scanned the document. Everything worked very fine until I found that it was an unregistered version and I have to buy it for USD 39 from the creators. They place a watermark in the output image until you buy the original software, which makes the entire image useless. Actually I was not in a position to buy that it at that moment since I was just in a hurry to get the documents get scanned (because I would have get the job done by a local shop for a very low amount). So I looked around for a temporary solution and I found some sites which offer Serial numbers for this particular application. So I tried them with the software and the keys were recognized as valid, but still the watermark was there as it is. (No, just somewhat different :D actually the number of watermarks got reduced to four.) But still the image was useless.

I tried the serial numbers just to test the software, whether I could get the job done since it was just a single document, but it didn't work as I expected. I think the results would have been same even if I have bought the software.

I do not recommend or suggest you to use pirated or cracked software. Always try to buy the original software. But still it is very important that you review about the software or the product before you actually buy it.

This was a good experience for me. I was thinking what I would feel if I have bought this. It was not really working as I expected. The serial keys I used were apparently OK or valid since the application identified them.

Please share your ideas if you ever had any experience like this……It will be useful for others :)


Vuescan cracked Professional Edition Full Version Download

Please Click on the following URL to download Vuescan Cracked Version.

Link : http://j.gs/3JBO
Instructions : Above link will take you to the Adfly URL shortner. Please wait for 5 seconds and click on the Skip Ad button appearing on the right hand top corner to download the file.

It will directly download the file. Download and install the software at your own requirement as I have no connection with the file uploader and I do not take any responsibility because I do not recommend to use Cracked Software.

Why Google entered to the social network competition?

Wish all my friends a nice week :) I couldn't write anything in the last couple of days since I was on a trip with my office colleagues. I returned back to my home yesterday and tried to recall what I have been planning to write, but I have forgotten them all.

Anyway, I read through my blog posts once again and I remembered that I wanted to tell something about Google+ as well. So here I am posting another idea. Remember, as usual this is also going to be only an idea, this may not be the real reasons, and these are just what I am thinking and what I see.

Alright, Google+ (plus) is not a new thing for many of us now. And we know that it is the social network site launched by Google. Luckily I was an early bird to use it. At the beginning I was also there among the people who thought that this time will also be another failed attempt of Google. I had a reason to think so. In the earliest period where they introduced Google+, apparently there were no active users. And everybody felt the usual boredom of an empty site. After a few months what Google+ did was they automatically created many circles for me, and automatically added around thousand of active users to my circles. Then only I felt that this is good place to hang out. Actually what I noticed was that Google was not ready to easily put away all their efforts this time. Google+ is a great social community with some of the best features and it was clearly seen that they have put a very big effort in developing it. So it was worth for them to try everything possible to make it successful. And ultimately they did it.

Google+ was not the first attempt of Google to launch a social site. There were few tries before, but unfortunately they could not achieve a success like their last attempt, Google+.

Google is a giant in the internet. Undoubtedly it is the number 01 site (according to the Alexa rank). Their main product is Google search and besides that they offer dozens of other online services. Hence it is worth to speak about why Google needed to launch a social site? Do they want to compete with facebook? Or do they think that facebook is becoming a threat to them? Well, I do not know. But I see something behind everything. It is to not to compete with facebook or twitter, but to make their Google search more effective.
If you wonder what I am going to write today, it is this. We have been talking about blogger, Google search, and most the important thing, Google Adsense. Also we noticed the common link in between them. The personalized search results and advertisements. It is very clear that every other feature they introduced was to tweak the effectiveness of Google search results. That means they wanted to provide the exact search results which the user wanted to see.

Ex: Suppose you are a php web developer and you do a Google search for the term “new trends in Web development”. We know that there are many web development programming languages around, and probably Google will show results relevant for each and every of them like php, perl, Ruby, Python, Java, asp and so on. So you will find it is difficult to find the results relevant for PHP (Since you have not mentioned about PHP in your query).

Now consider the same incidence, but now Google knows that you are a PHP web developer (by any means. Let’s see how they get to know it later). And now when you do a Google search for the term “new trends in Web development”, Google will understand that you are interested only in PHP and hence they will give the priority to results that match with PHP and drop the results for other languages. See the difference. Now you will see a bunch of interesting search results at the top (all the PHP stuff will come on top). You do not need to dive through the search results list to find results match your query.  

I hope now you understood the importance of Google’s personalized search results.

Right, If Google doesn’t want to compete with other sites like Facebook and twitter, why they introduced Google+? The main reason as I see is, by having a social community like Google+, Google can collect personal data of its users more effectively. That means Google will have access to a lot more information about you than what they have collected from storing cookies on computer, or reading what you have searched earlier.

It is a usual thing that we all update our name, location, education, and the occupation in a social community website. These are very important things for Google. Say, by retrieving your previous queries, they cannot exactly predict who you are or what is your occupation or the location. In the meantime, advertisers find these data useful when it comes to the adsense. They will consider many factors when advertising a product. For example, there is no use in advertising a book about chemistry for a person who has a very low educational level. He / She will not care about the advertisement, and hence it is a waste of money and time.

How Google collect information about you from google+?
Answer is really simple. They collect and analyze everything you do in Google+.
Have you ever used Google communities? If so, you would have seen that Google+ suggests you communities, and they are all about the subjects you are interested in.

Here is my suggestions page.


How did they get to know about my subjects that I am interested in? Well, I studied science for my advanced level, and Google+ has suggested me a community about science (Probably they get to know this from my search history). Cool, I have an Android device and the second community is about android. This is great, I do search about android a lot using Google, and also I use Google Play store. Well, Then it is true that Google use all these collected data across all their Google products. All the other suggestions are similar.
Also Google stores about the posts you are plussing (Post you +1) and about the people you are adding to your circles. These things are really good hints about you to Google.

We know that even in our society, people measure you from the friends you have :). So be careful about people you are following :D


I hope I have discussed everything I wanted, and finally the conclusion is Google introduced Google+ to collect information about their users. That is why Google forces each and everyone who are using other Google products to use Google+. The best example is Blogger. They converted the Blogger profiles into Google+ profiles. These are clear things and I have discussed only about what I see and what I think. You are free to comment about my thought. And I look forward to hear your ideas…