Showing posts with label Tech. Show all posts

Solved - Ubuntu Remmina Unable to connect to RDP server.

I recently got this error while trying to remotely login (RDP) to one of the Windows servers in my local network from my Ubuntu 14.04 laptop. At first I thought this happens because my windows login password might have expired. This is one reason I got this same error in the past. (So if you get this error, you should try to reset your password too.)

But then even after resetting the password I was not able to connect. I got the same error, "Unable to connect to RDP server." I was looking around the Internet for some hints as to why this happens and I found a lot of solutions. I was a little bit confused here because the same settings worked when I tried to connect to my other Windows servers. Somehow I finally got it working and here I'm posting the solution which worked for me.

Once you are confirmed that your username and password are correct, you should change the setting mentioned below. It might work for you, or not work, who knows :)

This is what I did. Edit your connection, and go to Advanced tab, changed the security from "negotiate" to "RDP"  (Negotiate was the default value selected). Tried connecting and it worked :D

Remmina Unable to connect to RDP server


This might be different for you. So you can try changing it to TLS, NLA, RDP and see which one works for you. These are the authentication methods used by your Windows server to connect between the two computers.

If you want to know more about these authentication types and why this is required, I did a little search for you, here's what I found on the Microsoft website.

By default, RD Session Host sessions use native RDP encryption. However, RDP does not provide authentication to verify the identity of an RD Session Host server. You can enhance the security of RD Session Host sessions by using Secure Sockets Layer (SSL) Transport Layer Security (TLS 1.0) for server authentication and to encrypt RD Session Host communications. The RD Session Host server and the client computer must be correctly configured for TLS to provide enhanced security.
The three available security layers are:

    SSL (TLS 1.0) SSL (TLS 1.0) will be used for server authentication and for encrypting all data transferred between the server and the client.

    Negotiate The most secure layer that is supported by the client will be used. If supported, SSL (TLS 1.0) will be used. If the client does not support SSL (TLS 1.0), the RDP Security Layer will be used. This is the default setting.


    RDP Security Layer Communication between the server and the client will use native RDP encryption. If you select RDP Security Layer, you cannot use Network Level Authentication.


https://technet.microsoft.com/en-us/magazine/ff458357.aspx

I hope this would help someone. Please let everyone know by commenting on this post if you know any other solution :)

Oscommerce Password Generator

oscommerce password generator
Here is a little simple online tool for all those who are looking for a way to change the password of your oscommerce user account or your oscommerce admin account. You can simply put in your new password in the text box below, and click the generate button. This tool will generate the (MD5 + salt) hash which you can manually update in the database using phpmyadmin.

Note: Sometimes it might take 3,4 seconds to generate the password. Please be patient :)

Online Oscommerce Password Generator


Enter Your New Password :


Generated Password :

Joomla Last Database Query!

joomla database queryJoomla is a popular CMS used in creating websites easily without need to know the web development languages such as html or php. However, if you are a web developer who develops custom modules or components for Joomla, you will definitely have to face situations where you need to print the last executed mysql database query for debugging purposes. The scope of this article is to show the way of printing the last query.


As I have already mentioned, the following method is very useful when debugging your database related bugs in your Joomla component or module. Let us assume that you are running a simple query as below;

$db = JFactory::getDbo();
$query = $db->getQuery(true);
$query->select('*'); 
$query->from($db->quoteName('my_users')); 
$query->order('user_id ASC'); 
$db->setQuery($query);  

What I have done here is simply selecting all the data from my “my_users” table. I believe you already know what you have to do to get the data and print it from the above query. Let's say if you did not get the expected results from the above query, and you are sure that the table already has got data in it. Then definitely there should be something wrong with the query. So let's print it and see whether our query is properly generated. Adding the following lines below the above code will print the last query which is being executed.

echo $db->getQuery();
die(); //break the code below this line.

Now you can see the query in plain text, so you can check if there is anything wrong in it like incorrectly spelled table name, column name or any other mistake in your query. Also you can run this query in your phpmyadmin / or your mysql client software and see if it returns any data.

Joomla database query, Joomla Database, Joomla mysql Bug


Find the host name of the mysql connection in PHP

Find the host name of the mysql connection in PHPIf you ever face any situation where you want to get the name of the mysql host you / your web application is connected to, you can use the following little query and find it easily. I recently worked in a project which was initially developed by someone else, and I had to make some minor changes in the codings and the database tables. So I looked for the connection file and found out that the host name mentioned there was localhost (as usual). I had no cpanel login details with me. Besides, for database things what I usually do is, I make a connection to the database using my Navicat and run all queries there as it saves a lot of the time.

In cases where I need to find the host name, I use the following mysql query. Here is how you can use it in your PHP application and quickly find out the mysql hostname.

<?php
$sql = "SHOW VARIABLES WHERE Variable_name = 'hostname'";
$qdata = mysql_query($sql);
print_r(mysql_fetch_array($qdata)); // prints debug.
?> 

Now you can easily connect to the mysql database with your favorite database client.

Please feel free to leave a comment if this article was helpful to you :)

Embed FLV video in HTML

Embed FLV video in HTMLA “Video” is an essential element for many websites today. Unlike in early days, the usage of videos have significantly increased among internet users and the websites today. People tend to watch and react for videos very much than the usual static images. The availability of high speed internet connections and the many number of free video sharing websites like Youtube have made people to watch videos regularly. So as a webmaster, if you are not making use of videos in your website, you are losing many additional benefits you can get from your website.

When embedding videos in a website, you will have two options to select from.
  • Hosting your videos with a free video sharing website like “youtube.com”. 
  • Hosting in your own web server.
The main focus of this article will only be on the second option. We are discussing how to embed a video in your website which is hosted on your own web server.

Also, note that we are specifically talking about embedding FLV videos only.

We know that with HTML5, a new tag for embedding videos was introduced to embed videos in your websites. That is very easy to use and you can find many articles in internet for HTML5 video embed code samples. But the bad thing about this great HTML5 video tag is, you can't use this tag to embed FLV videos in your website. So definitely you will have to go for an alternate solution, and in this article I will show you a nice script which you can use to embed FLV videos easily in your HTML website.

To embed FLV videos, we are using a swf file which can be downloaded from the following URL.

code.google.com/p/youplayer/downloads/detail?name=mediaplayer.swf 

Download the above file and place it in your root directory, or the directory you have uploaded your FLV videos. I recommend to keep your FLV videos and this .swf file in the same directory.

Now, in your web page where you would like to embed the FLV video, you can paste below code. Make sure that you change the file paths correctly.
<embed allowfullscreen="true" height="250" src="/videos/mediaplayer.swf?file=my_video.flv" width="400"></embed>
 
The output of the above code will be as shown below;

Embedding FLV video in HTML
 

According to the above example code, the “mediaplayer.swf” is uploaded to the 'videos' folder, and my FLV videos are also in the same directory. I can now simply call the flv video file only using its name 'my_video.flv' since both the video and the .swf file are in the same location.

Even though we have discussed only about FLV videos here, you should know that this method can be used to embed any other common video formats in your website. This method is very useful when inserting FLV videos, since the native HTML5 tag doesn't support FLV.

I hope my article was helpful to you. If you find any errors or mistakes in my article please feel free to correct me :) 

Embed FLV video in HTML, FLV Html5, HTML video embed

How to edit any web page from your browser?

edit web page using browserIn this article I'm going to show you how you can edit any webpage using your browser.

First of all, remember that this is not a permanent edit to the webpage. We all know that when we are viewing a website, what happens is that simply we send a request to the web server asking for a particular webpage / website, and then the web server returns the HTML web page to us. Since we cannot convert this HTML content into a readable or visually pleasing content, we use web browsers to do this task on behalf of us, and show us the webpage.

What we do here is, we will change that HTML code returned by the web server, so the web browser will show the page as we changed it. Nothing is not going to be changed in the server side, ie. we are making changes only in the HTML code returned by the web server. It is like editing a copy of the web page we temporary have :)

I am using Firefox Web Browser to do this task. But you should know that this trick is not limited only to Firefox. You can do the same thing using Google Chrome as well. Since most of the steps will be remained similar in both the browsers, I will explain this only for Firefox. You can ask me anytime if you want support with any other browser.

How to Edit Web Page using Browser?

To start the trick, Go to any website. Here I am selecting my favorite search engine, Google.  http://www.google.com You may choose any website you like.

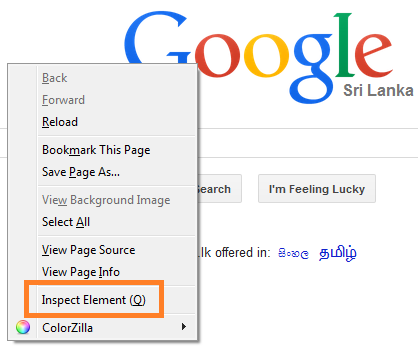
Once the web page is fully loaded, right click on an empty area and select "Inspect Elements" Option (which is the last option, in most cases). You can also use the shortcut key “F12” in Windows to activate this panel.

When you click on that, a window will open in the bottom of the screen (see the image below). There will be a small icon in your top left hand corner (It is an icon of a mouse pointer). Clicking on that icon will toggle a tool which you can use to select elements on the page.

With this tool you can select any element in the web page and edit it. In this example, I am going to replace the country name shown below the Google's logo with a my own version. These steps will be the same for every element inside the page.

Click on the above Mouse Pointer Icon. Once it is activated, click on the text below the Google's logo to select that text element. Since I am viewing the website from Sri Lanka, the text appeared here is “Sri Lanka”. I will change this text and type something like, “Sri Lanka - The Miracle of Asia”, which is more suitable :)


So first I will click on the text “Sri Lanka” using the select element option. Then in the inspect window, the selected text will be appeared. Now you can double click in the text inside inspect element window to make the text editable, and change the text as you wish.


This is one of the simple ways you can edit any webpage inside the browser window. (There are few other ways too). This tool is very useful for web developers and designers to make changes in a webpage which is under development, so they can see what is needed to be changed and give it a try in the browser itself without editing in their editors and reload the page to see the changes.


Bonus Tip for non techies :)

Well, I know that all of you are not Web Developers or Web Designers. So what's special for you?

Don't worry..I will tell you one thing...If you have any friends in your office who are always having their web browsers opened, you can use this trick. (make sure that they don't see you :D) Have fun!!!

Also, if you enjoyed this article please do not forget to leave a comment :)

Jquery Image Popup on page load simple plugin.

Jquery Image Popup simple pluginAn image popup sometimes become a very important element / feature to a website. We usually use popup images as banners to notify something important to our visitors. In the recent time I came through many occasions where I had to use this kind of an image popup when the page loads. There are many Jquery Image popup plugins available now. But the major disadvantage is that sometimes they are going beyond the expectations. I mean most of the Jquery plugins for popups are large in size or much advanced when compared to the simple requirement sometimes we need, which is just to insert a popup image in the webpage when the page loads.

Today I wanted to insert another image popup to a website, and the website was already using Jquery. But my concern was that I had a very limited time to implement this on the website, and since this website was having very big traffic, I did not want the plugin to be too big. Besides, this was only a temporary one. So I looked for a nice, yet simple and a light weight Jquery Plugin.

While searching, I found this simple plugin called 'Colorbox'. It matched my requirement exactly, and it was very light. No round ways like in other plugins and you get the ability to use it straight.

You can Download the Plugin and the other necessary files through link :

popup.zip - Download Jquery Image Popup Plugin.

This folder contains all the css, images and the javascript files.

How to Use this Jquery Image Popup Plugin?

It is simple. Once downloaded, extract the contents inside the zip archive into a folder in your website root. We'll call this folder as "popup".

Now your website structure would look like,

Document Root (public_html)
 |---   popup (our new folder)
 |---   your_other_folders
 |---   ...
 |---   index.html

Now open your desired file (which you need to insert the image popup) and put the following code in between your <head> </head> tag.


<link href="popup/colorbox.css" rel="stylesheet"></link>
<script src="https://ajax.googleapis.com/ajax/libs/jquery/1.8.3/jquery.min.js" type="text/javascript"></script>
<script src="popup/jquery.colorbox-min.js" type="text/javascript"></script>
<script type="text/javascript">
$(document).ready(function(){
    $.fn.colorbox({href:"popup/popup_image.jpg", open:true});
});
</script>


That's It....If you want to make the popup to appear a few seconds after  the page is loaded, you can change the script to below;


<script type="text/javascript">
$(document).ready(function(){
    setTimeout(function() {
        $.fn.colorbox({href:"popup/popup_image.jpg", open:true});
    }, 1500);
});</script>

Where 1500 represents the delay in miliseconds.
 

Hope you enjoyed my article. Please do not forget to leave a comment if this was helpful to you. :)
 

Incoming Terms :
jquery image popup
jquery popup image
jquery simple popup
jquery open popup
jquery popup window
jquery popup

Joomla Datepicker : How to insert in components

Joomla Datepicker


joomla datepickerJoomla is a popular Content Management System which helps people to develop websites easily without the need of learning web development languages like html, css, php etc. Anybody who is having a basic understanding of using web based softwares can create and maintain a website using joomla as it is already equipped with many modules and components, backed and developed by its open source community. Joomla is Free, Open Source and more than everything, it is easy to use. Joomla was the most popular and the most used CMS for websites few years ago. The usage of Joomla was slightly gone down over the time with the growth of another elegant Open Source CMS, called “Wordpress”. Many web developers preferred Wordpress over the Joomla as it was simpler to use. But Joomla is still being used by many web developers and webmasters to create websites as it has more features than in Wordpress. In this article, I am going to show you how to insert a datepicker in your custom developed Joomla Component or a Module.

Joomla has its own datepicker built within the Joomla framework for you to use in your components. To insert the datepicker simply put the following code.

<?php
JHTML
::_('behavior.calendar');
?>


Then wherever you want to include the datepicker, you can call the following function

<?php 
echo JHtml::calendar('date''%Y-%m-%d');
?>


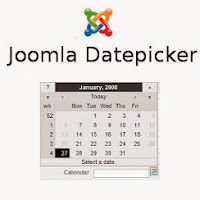
This will generate a datepicker textbox as below;


So that is how to insert a datepicker within your custom Joomla component or Module. See how easy it is. You can use this datepicker for any kind of a component related to the time and date. For an example, if you are developing a Hotel Reservation Component, you can simply integrate this datepicker for a availability checker or a check-in date selector. One thing I am not happy about this datepicker is that it is not that much beautiful. It will definitely not go with a modern template, so you will have to use some third party datepicker plugin for sure ;) This will be useful if you are not concerned much about the design of the datepicker. Anyway, the scope of this article was only to show the way of adding the built in Joomla datepicker in your custom components. The decision to use it or not will be always up to you :)

Please leave a comment if this post was useful to you.

MySql : How to copy records from one table to another

MySql : How to Copy records from one table to another


Mysql is one of the most used databases in the world. It is proved with the number of websites using MySql as their database system, and today, the most popular Content Management Systems including Worpdress, Joomla and many other Blogging Platforms are also using MySql. One reason for the popularity of Mysql is it is Free and Open Source. 

So if you are also working with MySql databases, this blog post will be there to help you someday.

Sometimes you may face instances where you want to copy an entire record of a database table to another table

What I am going to show you today is the way of copying a row of a database table to another using a single Mysql query. This is very useful in cases where you want to take a backup record of a row. If the application you are developing has an option to view the update history of a certain record, you can simply do it with this query by copying the whole row to another table.

Note : For this query to work, both the tables must have same fields. 

Example : 
Here We are considering two tables, 'JOBS' and 'JOBS_BACKUP'. Note that both the tables have the same fields and same properties. In this case, the user is updating the Job which has the ID : 8, and I wanted to take a snapshot of the Job details for the job id 8, as how it was before editing. So later if needed, I have the ability to compare the difference between the two versions, and also I will have all the information I need to check which user has made the update, and when the update was done etc. 

INSERT INTO jobs_backup (
job_id,   
cat_id,
user_id,
start_date,
description,
job_location,
date_created,
last_update,
last_editby,
verified
) SELECT
job_id,
cat_id,
user_id,
start_date,
description,
job_location,
date_created,
last_update,
last_editby,
verified
FROM
jobs 
WHERE
job_id = 8;

As a general query, We can rewrite the above again as :

INSERT INTO table_02 (
field_1,   
field_2,
field_3
) SELECT
field_1,
field_2,
field_3
FROM
table_01 
WHERE
field_1 = 'your value';

I hope this would be helpful to someone who is looking for a way to copy database records in between two tables. Please don't forget to share your comments on this post if this was useful to you :

The Story of Gmail’s new tabbed interface


If you are using Gmail daily, this is not a new thing for you. But few days ago, Google introduced a new tabbed interface into the Gmail accounts, and this post is all about it.
If you are not familiar with this new interface, you might get a clear idea about it after reading this. So keep reading :)

The Old story…………..

We know that, Gmail was started as a service by Google to overcome the problems we had with other email service providers like Yahoo & msn. They were the most popular email services before the arrival of Gmail. The main problem of these old services was the space they provided. It was a very little amount of storage and users had to keep their inboxes cleared to welcome the new emails. Then Google introduced their new product, Gmail. They promised that they will provide unlimited storage for their users. But by now they offer only 10 GB of free storage, and it is comparatively a fair storage for nothing (I mean for free :D).

Why is it?

What I wanted to tell you was that Gmail / Google always introduces new things to help their users. This new tabbed interface also the same. Since emails have become an essential part of our day to day lives, it is important that we do not miss any email because each and every email will be useful most of the times. Hence Gmail has come up with this new interface which will bring you a clean and a well organized inbox.

How it works?

Gmail will automatically add 3 tabs (by default it has 05 pre generated tabs) to your inbox as Primary, Social, and Promotions. Other two are Updates and Forums, and they are not activated by default.

The Good news is that if you do not like this tab thing you can always hide them.


Why I need those tabs?

OK, be cool….They will just filter your emails in the inbox. Don’t worry…all your mails are there. Read the below lines and you will find exactly what it will do for you :)

Primary Tab: the mails you usually receive from other people, especially from the people you know by the name of the sender will be included in this tab. (to be exact, the emails you receive from an individual. Cool. Got it?)

Social Tab: I know, we all are social addicts, maybe either Google+, Facebook, twitter or anything else, we all use them. But what’s the bad with them? Yes they do send emails daily. Yeah? Personally I don’t like this type of emails. The problem is now solved. Those mails will directly go to the social tab.
See how easy? Now no more hassles choosing the important mails…

Promotions Tab: If you have subscribed to any mailing list, you may already have experienced the spam-my type useless mails (most of the times they send crap.)
No problem, now you don’t need to worry about them. Gmail will filter them for you.

Updates Tab: This tab will filter emails which are in the type of confirmations or receipts or bills. Say if you have registered for a website, and they want you to reconfirm your email address. You will get en email from them. So this is an important tab. If you have not activated this tab, the emails in this category will be shown in the primary tab.

Forums Tab: This is similar to the above Promotions tab, but this includes the emails from Public Forums, or Group discussion boards which you are engaged in.

How to use the tabs?

Well, actually you don’t have to do anything. Gmail will handle everything for you.
But still if you need any email to be shown in a specific group, you can drag and drop the email to the tab you need. Gmail will ask you whether you need to follow this action for the future mails from this sender. 

Click on yes.

It is simple as that.


To manage the tabs, click on the + icon next to the tabs. It will bring up the options box. Or click on the settings button (the toothed wheel icon on the top right corner), and click on “Inbox Options”. It will also open the same options window. To make any tabs hide or visible, just use the check box to tick or un-tick the tab. To completely hide the tabs, un-tick all the check boxes and click on save button. (You can’t un-tick the primary tab, but it will not be shown if other tabs are not selected).


Inbox options window


Summary.....

Gmail introduces all these features to enhance the experience of its users, and hence to increase the user friendliness. Ultimately, it is an important factor for any product, maybe it is either an Online or an offline product, the user friendliness is still important. So do you think this feature of Gmail will be helpful? Or have it been already useful to you? 

Leave your ideas for others…….

Things Google Know about you

Today I have brought you another cool topic. So far we have been talking about Google and why they need to know about you and me. If you haven’t read that post yet here is the link,


What we were discussing there was about the Google’s endless desire to collect information about their visitors. We saw that Google is creating a general idea about you based upon these data for their advertising purposes (and also to provide a better experience for you).

So today we are going to see what Google knows about you. But before we start let’s consider some important things. 

Why you need to know about this?
Yes, if you do not have any idea about this, you might not understand the importance and the risk behind this. If you are using any website, it is very important to be aware about their policies. You should know whether they collect any of your personal details, whether they store Cookies in your computer. If they do so, definitely they will mention about that in their policies, and by using the website you eventually agree to their terms and conditions, which mean you allow collecting your personal details. That is the same scenario with Google as well.

Sometimes people use Google to search about very sensitive things. As an example let’s say a person is having a serious problem which bothers him / her so much, and he is not in a position to reveal it to anybody else. Now this person wants to know the opinion of others about that problem, and whether anybody else has had the same experience. So as the best option available he uses Google to search the internet (yes you are right, probably he will find something similar in Yahoo answers :D). The most important thing is, now this person has left very sensitive information about him online. Even though Google protects the privacy of its users, what will happen if anybody else gets this information? Yes, it will be a serious question. So you must think twice before acting online. The purpose of this article is to make you aware about this. Luckily now you know this, and also you have the ability to see what Google is storing about you.
My suggestion is, do not leave any personal data with Google. That will be healthy for you. In the meantime do not worry about other simple and common queries you search in your day to day life. Those queries will help you to get the search results that match with your preferences.

 What data Google has collected about me?
This will be the question you will have once you finish reading the above paragraph. Well, the main data will be your search queries. Besides them, they log your activity in internet including the sites you visit, emails in your Gmail inbox etc.

How to find the details Google stored about you?
You cannot view all the logged details. But as a summary you can view your activity in Google. This feature is known as “Google Web History”.


First you have to visit http://google.com/history/

You can see they have stated why they are storing these data with them; read the tagline, “Your history makes your Google experience better”. This is what I have been explaining to you.
·         More Relevant Results.
·         Smarter Predictions.
·         History on any device.

Then you will be asked to log in to your account.

Once you log in, you can see some detailed reports about your online activity in Google including the total number of Searches you have made through Google, Your daily, weekly & monthly activity,
Below those charts, you will see all your queries stored by Google, from there you can choose which queries to be kept and which queries to be deleted. As I mentioned earlier, if you find anything very sensitive, immediately delete that from the history.

Now, something from me :)


This is a snapshot of my dashboard taken few days back;

Hourly search activity
You can see that I am mostly searching Google in the middle of the day, Look at how the length of the bars have increased suddenly from 6 to 8, and gradually getting increased till 12. After that the length drops down till 6.  And exactly at 8 the bar goes up. Yes, I agree with this chart. I start my day at 6 am, and sometimes I search Google from the very moment I wake Up :D After that I go to work at 8 am and till 5 pm, I search many things (Hope my boss will not read this post :D). You also can check whether your graphs match with your daily routine. (Don’t forget to leave your idea here as a comment.)


I hope you enjoyed reading this post and at least few of you guys added something to your life. Of course these stuffs are really cool to check out. Please let me know what you think.

Why Google want to know about you?


Alright, today I come up with another cool thing to discuss; this is a bit serious one and also this is a question which you must definitely worry about.

Have you ever wondered what sort of things Google knows about you? I guess most of your answers will be “NO”. It is maybe because you are not aware about such a thing, or that doesn't make any sense with you. Anyway, if you have really worried about this, and still you couldn't find an answer, here is the place. I will tell you what Google knows about you :) and still, if you never thought about that, here is a good opportunity. Get to know what Google knows about you. It will be useful.

Tip: Google is a company which engages in providing online services. Hence if you have ever used Google to search something, you will eventually become a customer of them. They treat you like a customer.  Every company would want to know something more about their customers. Similarly, there is no exception with Google. They also need to know about their customers.

There are many things to discuss, when it comes to Google’s user tracking attempts and how they do it. Those are really cool stuff; so I will talk about them in coming posts in details.

Why Google need to know about you?
As we discussed in our previous topic, the main stream of income for Google is through advertisements. By knowing about you, Google can decide which type of advertisements should be visible to you. So Google can bring you the ads which are relevant to your interesting areas. In the meantime, for the advertisers, Google is showing ads only for people who are interested in the advertiser’s product or the service. Hence there is a high possibility of converting the visitor into a customer (for the advertiser).

How Google get to know about you?
Google has several ways to track a visitor. And they keep finding new methods to track the users very accurately. The simplest method used by Google is storing a Cookie in your computer. 

A Cookie is a very small data file which can be stored in your computer by a website. This file can contain data about your last visit to a website, your usernames, email ids etc.

What Google do is they store a cookie in your computer which will be there for 180 days, so that Google can identify you every time you visit Google’s website. Then they store everything you search in a database. We will talk what they do with these data, in the latter part of this post.

Even though this seems like a good trick, it is not always accurate. Suppose a computer which is used by several people. Then Google will have the search queries of many people. But what they need to know is about each and every one. Not about all the people at once.
So what they did next is they introduced a new feature to search the web using Google, while the guests are logged into their Gmail accounts. This method obviously helped Google to track users in a unique way. Because every time you leave a public computer, you will always sign out of your Google account. So Google knows that every query after the logout is done by another user. If nobody is logged in, Google will use the Cookie method to track the computer.

Now let’s come back to the topic again. 

What Google do with those stored data / queries?

They analyze every search query performed by each user and generate a simple idea about you. This helps them to differentiate you from others and also to decide which category of advertisements matches best to you.

For example: if you are a web developer or a web designer, you might be searching Google about day to day errors you get, or you may be searching about website layout ideas or about tutorials on Php, html, javascript and so on.
Since google have all these queries, when they analyze you, they will understand that you are a person who is interested in Web Development, designing, web hosting etc. So they will show you ads relevant to that subject. Say if you were searching for a php script, and you see an advertisement saying “Get free php scripts!!” Won’t you click on it? Yes you will.

This is the idea behind these tracings. Actually Google does not want to collect your personal information. They only attempt to get an idea about you so that they can help you find what you want.

Google use these tracked information about you in each and every product of Google. Even in the Google search results, they filter results according to your preferences. Yes, they know what you like and what you dislike. They know in which links you are clicking and not.
This is known as Google personalized results. We will discuss more about this in coming posts.

Now my question to you…..Have you ever experienced the effect of Google’s personalized results? Share your experience with others.