Joomla Last Database Query!

joomla database queryJoomla is a popular CMS used in creating websites easily without need to know the web development languages such as html or php. However, if you are a web developer who develops custom modules or components for Joomla, you will definitely have to face situations where you need to print the last executed mysql database query for debugging purposes. The scope of this article is to show the way of printing the last query.


As I have already mentioned, the following method is very useful when debugging your database related bugs in your Joomla component or module. Let us assume that you are running a simple query as below;

$db = JFactory::getDbo();
$query = $db->getQuery(true);
$query->select('*'); 
$query->from($db->quoteName('my_users')); 
$query->order('user_id ASC'); 
$db->setQuery($query);  

What I have done here is simply selecting all the data from my “my_users” table. I believe you already know what you have to do to get the data and print it from the above query. Let's say if you did not get the expected results from the above query, and you are sure that the table already has got data in it. Then definitely there should be something wrong with the query. So let's print it and see whether our query is properly generated. Adding the following lines below the above code will print the last query which is being executed.

echo $db->getQuery();
die(); //break the code below this line.

Now you can see the query in plain text, so you can check if there is anything wrong in it like incorrectly spelled table name, column name or any other mistake in your query. Also you can run this query in your phpmyadmin / or your mysql client software and see if it returns any data.

Joomla database query, Joomla Database, Joomla mysql Bug


Find the host name of the mysql connection in PHP

Find the host name of the mysql connection in PHPIf you ever face any situation where you want to get the name of the mysql host you / your web application is connected to, you can use the following little query and find it easily. I recently worked in a project which was initially developed by someone else, and I had to make some minor changes in the codings and the database tables. So I looked for the connection file and found out that the host name mentioned there was localhost (as usual). I had no cpanel login details with me. Besides, for database things what I usually do is, I make a connection to the database using my Navicat and run all queries there as it saves a lot of the time.

In cases where I need to find the host name, I use the following mysql query. Here is how you can use it in your PHP application and quickly find out the mysql hostname.

<?php
$sql = "SHOW VARIABLES WHERE Variable_name = 'hostname'";
$qdata = mysql_query($sql);
print_r(mysql_fetch_array($qdata)); // prints debug.
?> 

Now you can easily connect to the mysql database with your favorite database client.

Please feel free to leave a comment if this article was helpful to you :)

Embed FLV video in HTML

Embed FLV video in HTMLA “Video” is an essential element for many websites today. Unlike in early days, the usage of videos have significantly increased among internet users and the websites today. People tend to watch and react for videos very much than the usual static images. The availability of high speed internet connections and the many number of free video sharing websites like Youtube have made people to watch videos regularly. So as a webmaster, if you are not making use of videos in your website, you are losing many additional benefits you can get from your website.

When embedding videos in a website, you will have two options to select from.
  • Hosting your videos with a free video sharing website like “youtube.com”. 
  • Hosting in your own web server.
The main focus of this article will only be on the second option. We are discussing how to embed a video in your website which is hosted on your own web server.

Also, note that we are specifically talking about embedding FLV videos only.

We know that with HTML5, a new tag for embedding videos was introduced to embed videos in your websites. That is very easy to use and you can find many articles in internet for HTML5 video embed code samples. But the bad thing about this great HTML5 video tag is, you can't use this tag to embed FLV videos in your website. So definitely you will have to go for an alternate solution, and in this article I will show you a nice script which you can use to embed FLV videos easily in your HTML website.

To embed FLV videos, we are using a swf file which can be downloaded from the following URL.

code.google.com/p/youplayer/downloads/detail?name=mediaplayer.swf 

Download the above file and place it in your root directory, or the directory you have uploaded your FLV videos. I recommend to keep your FLV videos and this .swf file in the same directory.

Now, in your web page where you would like to embed the FLV video, you can paste below code. Make sure that you change the file paths correctly.
<embed allowfullscreen="true" height="250" src="/videos/mediaplayer.swf?file=my_video.flv" width="400"></embed>
 
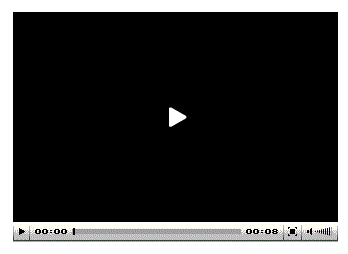
The output of the above code will be as shown below;

Embedding FLV video in HTML
 

According to the above example code, the “mediaplayer.swf” is uploaded to the 'videos' folder, and my FLV videos are also in the same directory. I can now simply call the flv video file only using its name 'my_video.flv' since both the video and the .swf file are in the same location.

Even though we have discussed only about FLV videos here, you should know that this method can be used to embed any other common video formats in your website. This method is very useful when inserting FLV videos, since the native HTML5 tag doesn't support FLV.

I hope my article was helpful to you. If you find any errors or mistakes in my article please feel free to correct me :) 

Embed FLV video in HTML, FLV Html5, HTML video embed

How to edit any web page from your browser?

edit web page using browserIn this article I'm going to show you how you can edit any webpage using your browser.

First of all, remember that this is not a permanent edit to the webpage. We all know that when we are viewing a website, what happens is that simply we send a request to the web server asking for a particular webpage / website, and then the web server returns the HTML web page to us. Since we cannot convert this HTML content into a readable or visually pleasing content, we use web browsers to do this task on behalf of us, and show us the webpage.

What we do here is, we will change that HTML code returned by the web server, so the web browser will show the page as we changed it. Nothing is not going to be changed in the server side, ie. we are making changes only in the HTML code returned by the web server. It is like editing a copy of the web page we temporary have :)

I am using Firefox Web Browser to do this task. But you should know that this trick is not limited only to Firefox. You can do the same thing using Google Chrome as well. Since most of the steps will be remained similar in both the browsers, I will explain this only for Firefox. You can ask me anytime if you want support with any other browser.

How to Edit Web Page using Browser?

To start the trick, Go to any website. Here I am selecting my favorite search engine, Google.  http://www.google.com You may choose any website you like.

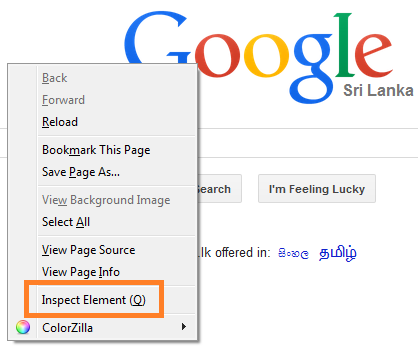
Once the web page is fully loaded, right click on an empty area and select "Inspect Elements" Option (which is the last option, in most cases). You can also use the shortcut key “F12” in Windows to activate this panel.

When you click on that, a window will open in the bottom of the screen (see the image below). There will be a small icon in your top left hand corner (It is an icon of a mouse pointer). Clicking on that icon will toggle a tool which you can use to select elements on the page.

With this tool you can select any element in the web page and edit it. In this example, I am going to replace the country name shown below the Google's logo with a my own version. These steps will be the same for every element inside the page.

Click on the above Mouse Pointer Icon. Once it is activated, click on the text below the Google's logo to select that text element. Since I am viewing the website from Sri Lanka, the text appeared here is “Sri Lanka”. I will change this text and type something like, “Sri Lanka - The Miracle of Asia”, which is more suitable :)


So first I will click on the text “Sri Lanka” using the select element option. Then in the inspect window, the selected text will be appeared. Now you can double click in the text inside inspect element window to make the text editable, and change the text as you wish.


This is one of the simple ways you can edit any webpage inside the browser window. (There are few other ways too). This tool is very useful for web developers and designers to make changes in a webpage which is under development, so they can see what is needed to be changed and give it a try in the browser itself without editing in their editors and reload the page to see the changes.


Bonus Tip for non techies :)

Well, I know that all of you are not Web Developers or Web Designers. So what's special for you?

Don't worry..I will tell you one thing...If you have any friends in your office who are always having their web browsers opened, you can use this trick. (make sure that they don't see you :D) Have fun!!!

Also, if you enjoyed this article please do not forget to leave a comment :)

Jquery Image Popup on page load simple plugin.

Jquery Image Popup simple pluginAn image popup sometimes become a very important element / feature to a website. We usually use popup images as banners to notify something important to our visitors. In the recent time I came through many occasions where I had to use this kind of an image popup when the page loads. There are many Jquery Image popup plugins available now. But the major disadvantage is that sometimes they are going beyond the expectations. I mean most of the Jquery plugins for popups are large in size or much advanced when compared to the simple requirement sometimes we need, which is just to insert a popup image in the webpage when the page loads.

Today I wanted to insert another image popup to a website, and the website was already using Jquery. But my concern was that I had a very limited time to implement this on the website, and since this website was having very big traffic, I did not want the plugin to be too big. Besides, this was only a temporary one. So I looked for a nice, yet simple and a light weight Jquery Plugin.

While searching, I found this simple plugin called 'Colorbox'. It matched my requirement exactly, and it was very light. No round ways like in other plugins and you get the ability to use it straight.

You can Download the Plugin and the other necessary files through link :

popup.zip - Download Jquery Image Popup Plugin.

This folder contains all the css, images and the javascript files.

How to Use this Jquery Image Popup Plugin?

It is simple. Once downloaded, extract the contents inside the zip archive into a folder in your website root. We'll call this folder as "popup".

Now your website structure would look like,

Document Root (public_html)
 |---   popup (our new folder)
 |---   your_other_folders
 |---   ...
 |---   index.html

Now open your desired file (which you need to insert the image popup) and put the following code in between your <head> </head> tag.


<link href="popup/colorbox.css" rel="stylesheet"></link>
<script src="https://ajax.googleapis.com/ajax/libs/jquery/1.8.3/jquery.min.js" type="text/javascript"></script>
<script src="popup/jquery.colorbox-min.js" type="text/javascript"></script>
<script type="text/javascript">
$(document).ready(function(){
    $.fn.colorbox({href:"popup/popup_image.jpg", open:true});
});
</script>


That's It....If you want to make the popup to appear a few seconds after  the page is loaded, you can change the script to below;


<script type="text/javascript">
$(document).ready(function(){
    setTimeout(function() {
        $.fn.colorbox({href:"popup/popup_image.jpg", open:true});
    }, 1500);
});</script>

Where 1500 represents the delay in miliseconds.
 

Hope you enjoyed my article. Please do not forget to leave a comment if this was helpful to you. :)
 

Incoming Terms :
jquery image popup
jquery popup image
jquery simple popup
jquery open popup
jquery popup window
jquery popup