Home
»
All posts
FTP clients for Ubuntu
Today, while looking for some good FTP clients for Ubuntu, I found this nice FTP clients list in AskUbuntu Forum. It has listed the best and top ten FTP clients available today for Ubuntu. I thought I must get a copy to my blog, so anyone who is in hurry would find it easily. Also, I've added a link to the original page at the bottom of the post :) Credit should go to the original poster of this reply at AskUbuntu.
To use it, go to


Original article - http://askubuntu.com/questions/109000/nicer-ftp-client-than-filezilla
1. Nautilus
Don't forget the FTP client that comes with Ubuntu! It integrates very nicely with Ubuntu, and is very easy to use. You don't have to install any additional software. However, it lacks many of the powerful features that a full-featured FTP client, like FileZilla has.To use it, go to
File > Connect to Server with the desktop selected. 2. gFTP
Another option is to use gFTP, a FTP client with a nice graphical interface that is different from FileZilla's, but only slightly. It can be installed through the Ubuntu Software Center or throughsudo apt-get install gftp.3. Kasablanca
Kasablanca is a GUI FTP client intended for use in KDE, but it will work in Unity too. The interface is very simple and it lacks some of the advanced features of more sophisticated FTP clients. It can be downloaded here.4. FireFTP
If you prefer a Firefox add-on, FireFTP is a great one that will allow you to transfer files from within the browser. Download it here.5. KFTPgrabber
A FTP client for the K Desktop Environment (KDE). It can be downloaded at kftp.org.6. GNOME Commander
GNOME Commander is an FTP client with a very unique interface that supports themes and customization. It can be installed through the Ubuntu Software Center orsudo apt-get install gnome-commander.7. Sitecopy
Sitecopy is a unique FTP client in that it automatically synches a directory on your computer with a directory on an FTP site automatically in the background. Details at the project's website, which can be found here. Sorry, but I couldn't find a screenshot for this one.8. Filerunner
Filerunner is an FTP client with a very basic interface. It can be installed through the Ubuntu Software Center or throughsudo apt-get install filerunner.9. Konqueror
Konqueror, a web browser for KDE, can access FTP sites when you typeftp://username@server.com/ into the address bar. it can be installed through the Ubuntu Software Center or through sudo apt-get install konqueror.10. net2ftp
net2ftp is an online FTP client which lets you upload files from the web browser without having to install any additional software. It can be accessed through net2ftp.com.Original article - http://askubuntu.com/questions/109000/nicer-ftp-client-than-filezilla
Imgur different image sizes and Thumbnails
So recently, I uploaded a large image to Imgur and embedded it to a forum and noticed that the image is too large to be displayed in an average screen. My image was covering the whole screen and soon I understood that other users are not going to be happy with what I have done. So I changed my idea to show a thumbnail of the image and give a link to the original image. But I've already closed the Imgur window. So I had no more information about the image.
The only option I had is to create two images, one thumbnail and one original. Then upload the both images to Imgur and embed them separately. But it was a lot of additional work, and I wanted something easy and simple. Luckily, I found their API documentation and there, they have mentioned about different image sizes. It was really simple.
If you want to get different image sizes, you only have to append a single character to the end of the image name as below. Imgur will then generate the thumbnails for you saving a lot of time.
Imgur provides 6 image sizes so you can select whatever the size suits your requirement. The following table shows you the different image sizes available.
| Thumbnail Suffix | Thumbnail Name | Thumbnail Size | Keeps Image Proportions |
| s | Small Square | 90x90 | No |
| b | Big Square | 160x160 | No |
| t | Small Thumbnail | 160x160 | Yes |
| m | Medium Thumbnail | 320x320 | Yes |
| l | Large Thumbnail | 640x640 | Yes |
| h | Huge Thumbnail | 1024x1024 | Yes |
For example, if your image is located at http://i.imgur.com/12345.jpg, you can get different image sizes as below;
Small Square - http://i.imgur.com/12345s.jpg
Big Square - http://i.imgur.com/12345b.jpg
Small Thumbnail - http://i.imgur.com/12345t.jpg
Medium Thumbnail - http://i.imgur.com/12345m.jpg
Large Thumbnail - http://i.imgur.com/12345l.jpg
Huge Thumbnail - http://i.imgur.com/12345h.jpg
Source: http://api.imgur.com/models/image
Notice the last character at the end of the image name (before the extension).
If you think I've missed anything, please feel to let me know that by leaving a comment here. Also, if you think this blog post is useful, please consider sharing it with your friends in Google+, Facebook and Twitter.
Sublime Text spell check
Sublime Text is a handy text editor which is also useful as a lightweight IDE. Most of the times, I use Sublime Text as my IDE to edit source codes. But recently I started using it to edit my text documents too. So the first thing I wanted in my text editor is a spell checker. By default Sublime Text provides two dictionaries. But you've to enable it to check the spellings because spell checking feature is not enabled by default.Here is how you can enable spell checking in Sublime Text.
Go to View -> Spell Check or press F6.
Now Sublime will highlight your misspelled words. You can right click on any misspelled words to see a list of correct suggestions.
Spell check is performed based on the dictionary you've selected. By default you will have two English dictionaries (en_US and en_GB), but if you want additional dictionaries you can always download them from the below Github repository.
https://github.com/titoBouzout/Dictionaries
Like all the other spell checkers, Sublime Text's spell checker is also not really perfect. Sometimes the suggested words are not the words you expect. But if you are looking for a basic spell check facility, the default Spell check is more than enough :)
If you still want a good spell checker, there's a Github project that check's the spellings through Google. You can see it here : https://github.com/noahcoad/google-spell-check
Finally, it would be a good idea to disable the spell check feature when you are editing source codes with Sublime Text, otherwise it will highlight most of your codings :)
Please feel free to leave a comment if you know a better way to check spellings in Sublime Text. Also share this article with your friends in Google+, Facebook and Twitter if you think this is useful.
List of working torrent trackers 2015 May
Last updated:
October 2016
If you are looking for the updated fresh working torrent trackers list for September and October of 2016, please read my new article here.
Torrent Trackers List 2016 September / October
The article you are about to read below is written in 2015 and may contain outdated information.
=================================================
Torrent trackers help you to download your torrent files faster by providing a better connection between peers and also they help you get more peers to your torrent download. I've found many trackers list in Internet. But it's not easy to find working torrent trackers as the servers get disabled suddenly. So here I bring you a fresh list of torrent lists working as at May 2015.
You can manually add the following trackers to your torrent download using your torrent client. The most recent, updated working tracker list is as follows.
Check this video to see how to add the trackers to your torrent client. This video will show you how to add the trackers in Transmission in Ubuntu.
Updated working torrent tracker list as at 2016 October:
Sorry guys, I had to remove the list this from my blog because I received a warning from Google. I moved the list to the following pastebin paste. Please open it to see the list.http://pastebin.com/YHEQSkRw
A dictionary for Ubuntu users - Artha
A few days ago, one of my friends suggested me a good book to read. Since I spend most of my time in front of the computer, I've got no time to read a printed version. So I downloaded the ebook as a pdf file. When I read that only I understood that it was a good decision to select the ebook over the printed version because there were many words which I had to use to a dictionary to find the meaning :)
Finding the meaning by typing in each and every word in Google is a time consuming task. Besides, it is not always easy to switch between the PDF reader and the browser. So I searched for a good dictionary to install in my computer, so I can easily look up words while reading.
I found Artha, a really good dictionary for Ubuntu. I wanted to write it in my blog so someone may find this useful in future :)
But you should know that Artha is not limited only for Ubuntu. It is a cross platform, fully off-line dictionary based on Wordnet. It works with major operating systems like GNU/Linux, Microsoft Windows and Windows Phone 7.
Here I'm showing you how I installed it in my Ubuntu computer and how to easily access it.
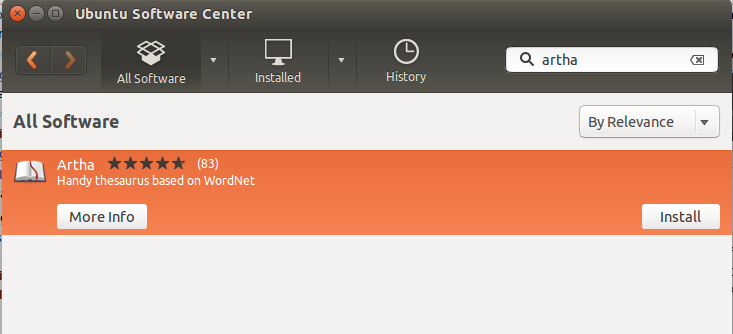
Artha is available in the Ubuntu software center. So you don't need to mess with command lines on terminal ;) Simply open the Ubuntu Software center and type "Artha" in the search bar. It will bring Artha on the list. Now click on Install button. It will ask you for your password, and the installation will get completed.
Now you can open Artha; there are many ways.
01. Using Terminal, type "artha" and press enter. (without quotes).
02. If it has created a shortcut in your sidebar launcher, by clicking on it.
03. Using the Unity launcher; Press Super Key and type in "Artha". It will display Artha in your application list, then click on it.
Once you start Artha, you can start using it anywhere.
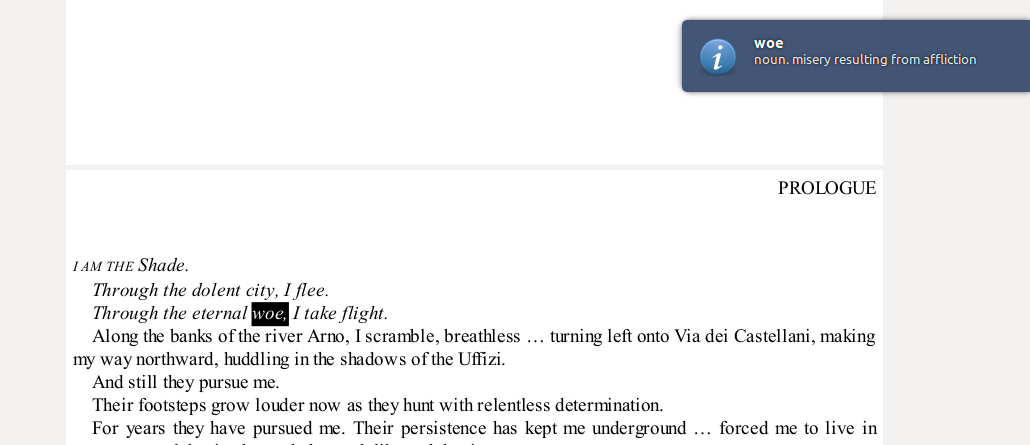
By default, Artha will assign it self the "Ctrl + Alt + W" shortcut key. If you select a word anywhere and press this shortcut key combination, it will show you a pop-up with the meaning of the selected word.
Here is a simple usage example. In my PDF reader while I'm reading my ebook, if I press the above shortcut key, Artha will show me the meaning like this. How convenient :)
I hope you will find this article useful. Please feel free to leave a comment and ask me anything if you have any problems installing or using Artha. Do not forget to share this article with your friends in Facebook, Google+ or Twitter too :)
Finding the meaning by typing in each and every word in Google is a time consuming task. Besides, it is not always easy to switch between the PDF reader and the browser. So I searched for a good dictionary to install in my computer, so I can easily look up words while reading.
I found Artha, a really good dictionary for Ubuntu. I wanted to write it in my blog so someone may find this useful in future :)
But you should know that Artha is not limited only for Ubuntu. It is a cross platform, fully off-line dictionary based on Wordnet. It works with major operating systems like GNU/Linux, Microsoft Windows and Windows Phone 7.
Here I'm showing you how I installed it in my Ubuntu computer and how to easily access it.
Artha is available in the Ubuntu software center. So you don't need to mess with command lines on terminal ;) Simply open the Ubuntu Software center and type "Artha" in the search bar. It will bring Artha on the list. Now click on Install button. It will ask you for your password, and the installation will get completed.
Now you can open Artha; there are many ways.
01. Using Terminal, type "artha" and press enter. (without quotes).
02. If it has created a shortcut in your sidebar launcher, by clicking on it.
03. Using the Unity launcher; Press Super Key and type in "Artha". It will display Artha in your application list, then click on it.
Once you start Artha, you can start using it anywhere.
By default, Artha will assign it self the "Ctrl + Alt + W" shortcut key. If you select a word anywhere and press this shortcut key combination, it will show you a pop-up with the meaning of the selected word.
Here is a simple usage example. In my PDF reader while I'm reading my ebook, if I press the above shortcut key, Artha will show me the meaning like this. How convenient :)
I hope you will find this article useful. Please feel free to leave a comment and ask me anything if you have any problems installing or using Artha. Do not forget to share this article with your friends in Facebook, Google+ or Twitter too :)
Python Bottle - TypeError: Secret key missing for non-string Cookie.
I was trying to set several cookies using the Python Bottle micro framework and ended up getting a 500 server error along with the above message. So I searched Google to find a solution for this, but I couldn't find any webpage that would help me. Then I opened the Bottle's documentation and read the cookies section, and there was another sub section under cookies, called Signed Cookies.
There I found that response.set_cookie() accepts a third parameter to encrypt the stored cookie. Although it's mentioned in the documentation that the cookie is still readable by the user, it was not directly readable, meaning it had an encryption. Apparently, the error was solved by using this third parameter, but when I try to read the cookie, it was encrypted. But I wanted to have a non-encrypted cookie.
But if I tried to use the response.set_cookie() without the “secret” parameter, it always gave me this error. TypeError: Secret key missing for non-string Cookie. Since I was not ready to keep the cookie encrypted, I tried to find the error in my code and found that I cannot have non-string cookies without the encryption. The third parameter was not needed if it's a string. But if the cookie value is something other than a string, say an Integer, it had to be encrypted with the secret key parameter.
Here is a section of the original code.
response.set_cookie("session_key", login_user[0]["session_key"])
response.set_cookie("loggedIn", 1) #this gives the error.
response.set_cookie("first_name", login_user[0]["first_name"])
response.set_cookie("last_name", login_user[0]["last_name"])
response.set_cookie("username", username)
If you notice the second line, it is an integer value. So it has to have the “secret” parameter. But If I pass the “secret” parameter, the values will be encrypted. Then I changed the integer to a string by wrapping it with quotes as shown below, and it solved my problem.
response.set_cookie("loggedIn", “1”)
I hope this will be useful to someone in the future because I didn't find any tutorial to help me with this when I had this problem. So I'm sharing my experience. If you think this is a bad practice, or if you know any better solution than this, please feel free to leave a comment and let others know it :)
There I found that response.set_cookie() accepts a third parameter to encrypt the stored cookie. Although it's mentioned in the documentation that the cookie is still readable by the user, it was not directly readable, meaning it had an encryption. Apparently, the error was solved by using this third parameter, but when I try to read the cookie, it was encrypted. But I wanted to have a non-encrypted cookie.
But if I tried to use the response.set_cookie() without the “secret” parameter, it always gave me this error. TypeError: Secret key missing for non-string Cookie. Since I was not ready to keep the cookie encrypted, I tried to find the error in my code and found that I cannot have non-string cookies without the encryption. The third parameter was not needed if it's a string. But if the cookie value is something other than a string, say an Integer, it had to be encrypted with the secret key parameter.
Here is a section of the original code.
response.set_cookie("session_key", login_user[0]["session_key"])
response.set_cookie("loggedIn", 1) #this gives the error.
response.set_cookie("first_name", login_user[0]["first_name"])
response.set_cookie("last_name", login_user[0]["last_name"])
response.set_cookie("username", username)
If you notice the second line, it is an integer value. So it has to have the “secret” parameter. But If I pass the “secret” parameter, the values will be encrypted. Then I changed the integer to a string by wrapping it with quotes as shown below, and it solved my problem.
response.set_cookie("loggedIn", “1”)
I hope this will be useful to someone in the future because I didn't find any tutorial to help me with this when I had this problem. So I'm sharing my experience. If you think this is a bad practice, or if you know any better solution than this, please feel free to leave a comment and let others know it :)
Modify Jquery Chosen select options dynamically.
Undoubtedly, every web developer would admit that Jquery Chosen plugin is a big time saver for them. It's not only saving the time, but it takes out the whole pain of modifying and converting those ugly html select boxes into more usable elements. It is even simpler to use because all you have to do is tell the plugin to do the hard work for you, because this plugin wants only a simple select box to do its magic, be it either a single select or a multiple select.
Here I'm going to share something useful I came across recently with this plugin. I hope this will be useful for someone in future :) Most of the times, I used Chosen to display a static dropdown list only. It can be done with a few lines of Javascript easily. But this time, I was using the plugin in a small single page app written using Jquery. When the user adds a new item, the options in the select box has to be repopulated with the new one included.
I went through the Chosen's documentation expecting to see some hints to get this done. Luckily I found this section.
So this is what I wanted. And here is how I did this using Jquery. I appended the new item to the options list and triggered the chosen:updated as they have mentioned in the documentation.
This is a simple thing, but chances are there that someone might miss this specific part while reading the docs. That's why I wrote my own blog post too :)
Please do not forget to leave a comment if this blog post was useful to you. Also please share this with your friends in Google+, Facebook or Twitter if you think this will be useful to them.
Here I'm going to share something useful I came across recently with this plugin. I hope this will be useful for someone in future :) Most of the times, I used Chosen to display a static dropdown list only. It can be done with a few lines of Javascript easily. But this time, I was using the plugin in a small single page app written using Jquery. When the user adds a new item, the options in the select box has to be repopulated with the new one included.
I went through the Chosen's documentation expecting to see some hints to get this done. Luckily I found this section.
Updating Chosen Dynamically
If you need to update the options in your select field and want Chosen to pick up the changes, you'll need to trigger the "chosen:updated" event on the field. Chosen will re-build itself based on the updated content.
$("#form_field").trigger("chosen:updated");
So this is what I wanted. And here is how I did this using Jquery. I appended the new item to the options list and triggered the chosen:updated as they have mentioned in the documentation.
var NewTopic = $('<option value="'+data.topic_id+'">'+data.topic_name+'</option>');
$('#choose-topics').append(NewTopic);
$('#choose-topics').trigger("chosen:updated");
This is a simple thing, but chances are there that someone might miss this specific part while reading the docs. That's why I wrote my own blog post too :)
Please do not forget to leave a comment if this blog post was useful to you. Also please share this with your friends in Google+, Facebook or Twitter if you think this will be useful to them.
DragonDisk - A Cyberduck alternative for Ubuntu to connect to Amazon s3!
When I was using Windows, I used Cyberduck to connect to the Amazon s3 to manage my buckets easily. But now, I'm moved to Ubuntu, and I wanted to have a good s3 client similar to the CyberDuck. So while I was looking for the best alternative, I found DragonDisk which was a great tool to manage the s3 buckets as in CyberDuck. It has a similar interface to the CyberDuck, so I think it will not be a problem for you to shift from CyberDuck to DragonDisk. So I thought I should write this in my blog so it would be useful for others as well. Here I'm showing how to install it. If you want further assistance on the software like how to use, please visit the DragonDisk website :) But it's fairly easy to use. Install, add your S3 details, and connect!
Step 01: First Download the release that matches with your Ubuntu installation from this link.
http://www.dragondisk.com/download-amazon-s3-client-google-cloud-storage-client.html
Step 02: It will download a .deb package. Once the download is complete, double click on it to run the installer. (it will open your Ubuntu Software Center to complete the installation.)
Step 03: Click on the Install Button.
Step 04: Finish! Now you can launch the DragonDisk either by using the Unity Launcher or the Terminal.
Press the “Super Key” and type in “DragonDisk” to locate it from the launcher. If you want to start it using the terminal, Open the terminal and type “dragondisk” without quotes and press enter.
This is how the Software looks once you open it.
To create a new account, Go to File->Accounts..
This will open a new window, click on New Button and enter your account details there. You can select the Cloud service provider you are connecting using the dropdown given.
Please let me know if this article was helpful to you. Also please do not forget to share this with your friends in Facebook, Google+ if you think this will be useful to them.
Gmail notifications css style.
I am working on an interesting project these days. There is this page where I have to display loading messages, success notifications etc. So I decided to make that notification box somewhat similar to the Gmail's notifications box. The main reason I wanted to make this similar to the Gmail's one is because its so easy to read, and the notifications are not disturbing the user. They look pretty cool, and simple.Gmail notifications css style.
I guess you might already have seen these notifications in Gmail so many times? If not check the image above.
Today I'm going to show you how you can create this notification style using css. It's a very simple thing. Let's Start. Here is the css, and there's nothing to explain. :)
.notify-outer {
left: 0;
top: 0;
margin: 0;
font-family: arial, sans-serif;
font-weight: bold;
visibility: hidden;
z-index: 8;
position: absolute;
text-align: center;
width: 100%;
height: 100%;
}
.notify -msg-box {
position: relative;
display: inline-block;
visibility: hidden;
font-size: 80%;
padding: 6px 10px;
background-color: #f9edbe;
border: 1px solid #f0c36d;
box-shadow: 0 2px 4px rgba(0, 0, 0, 0.2);
top: -15px;
}
Here is how to use it. You will have to make changes according to your requirements. I change the text of the span #msg dynamically using Jquery. So I have made the notifications hidden by default.
<div class="notify-outer ">
<div class="notify -msg-box">
<span id="msg" style="display:none;"></span>
</div>
</div>
Please feel free to share your thoughts on this. If you think this will be useful to your friends, please consider sharing this post over Google+, Facebook, Twitter etc.