Fix - DBeaver SSH tunnel connections fail with invalid privatekey error

Invalid privatekey error in DBeaver

I tried to connect to a remote Postgresql server with DBeaver and got this error today. The error message said my private key was invalid. To check this further, I tried to login to the server using the terminal as usual and it worked. So I realized the issue must be in DBeaver, and not in my private key.
After a few google searches, I learned that DBeaver does not support new OpenSSH private keys format by default. So as a workaround, I had to convert my key file to old PEM format using the following command and use it with DBeaver.

This will work if you already generated the keys with new format and want to use them with DBeaver.

ssh-keygen -p -m PEM -f ~/.ssh/id_rsa
If you want to generate new keys, use the following.

ssh-keygen -t rsa -b 4096 -m PEM

That’s it. I hope this will help someone.

Install Python packages to the current directory using PIP in Ubuntu 18

distutils.errors.DistutilsOptionError: can't combine user with prefix, exec_prefix/home, or install_(plat)base

I wanted to test something today and had to write a simple python script which required a few python modules. So I installed them using pip, but there was a little problem. I don't like it when package managers install packages globally or system wide. I wanted them to be installed in the current local directory. There's an option to create virtual environments for Python, but this was a simple script and I didn't want to do that, I just wanted to have the modules installed locally.

PIP has a --target option to define the target location to install the modules. But for some reason, it was not working and kept giving me the following error. It seems PIP uses the user scheme by default to install and when I use --target, it throws an error.

distutils.errors.DistutilsOptionError: can't combine user with prefix, exec_prefix/home, or install_(plat)base

After searching for a while, I found a workaround and got it working. Here's how to do that.  PIP also has another option as --system, it actually disables the user scheme option. That was it. But this option was not listed in pip man page.

Anyway, the final command should look like this:

pip install --system --target <target-dir> <package-name>

Ex: pip install --system --target ./ pexpect

Hope this post will save someone's time :)

VIM - get back to edit mode after Ctrl + S freezes the screen.

VIM - get back to edit mode after Ctrl + S freezes the screen.


I'm used to press ctrl + s all the time that even when I'm using VIM to edit some codes, I press it and you know, it freezes everything and you can't do a thing afterwards.

It has always been a problem and the first time I actually had to google how to get back to vim, today it happened again, and I had my blog open in my browser. So I thought I should add it in my blog, so that I would never forget it ;)

Anyway, its so easy, to get back to VIM, just press Ctrl + q. Then everything will work normally.

If you are curious why it happens, then here's the reason for that. When you press Ctrl + s, your terminal sends a signal (XOFF) to pause the process which sends data to it. To continue the process, you need to send an XON signal back, and it can be done by pressing Ctrl + q.

I hope its clear and it will help someone. Please feel free to leave a comment and let me know if you think I need to correct anything :)

Copy files to a stopped Docker container (and vice versa)

Copy files to a stopped Docker container (and vice versa)


Recently I had to copy a file to docker container to make some immediate changes on it. The container crashed and kept restarting every time we try to bring it up, so I was not able to access the container's file system. So while looking for a solution, I learned that it's possible to copy a file to a stopped container using the docker cp command.

You can also use the same command to copy a file from the docker container to your local environment.

This is how to copy a file into a docker container.

docker cp <local-filename> <container-name>:<file-location-to-copy>

Here's an example:

docker cp AppData integrationapi:/usr/local/src/integrationapi/AppData

That's it...I hope this will help someone :)

Updating Whiptail gauge (Progress bar) with Python

I spent last week writing a Python script to create an installer for some services, and I wanted to show the installation progress using a gauge. So I used the whiptail utility which comes with most linux distros as it was easier to use for this particular task. However, there was one caveat, that it reads the progress value from the standard input. It was a bit tricky and took me bit of a time to figure it out...but this is how to do it.

It's mentioned in the manual.

--gauge text height width percent
              A gauge box displays a meter along the bottom of the box.  The meter indicates a percentage.  New percentages are read from standard input, one
              integer  per  line.  The meter is updated to reflect each new percentage.  If stdin is XXX, the first following line is a percentage and subse‐
              quent lines up to another XXX are used for a new prompt.  The gauge exits when EOF is reached on stdin.

Whiptail is a bash utility so we have to call the bash command within our python script. I used subprocess module to do that. Since we have to input the progress values to the command using the standard input, we have to set it's stdin to subprocess.PIPE. Whiptail will print to the stdout, so we don't really have anything to do there (means, it will read from the stdin and display the progress accordingly.)

#!/usr/bin/env python

import subprocess
import time

process = subprocess.Popen(["whiptail", "--title", "Progress", "--gauge", "", "6", "50", "0"], stdin=subprocess.PIPE)

for i in range(0,101, 10):
    time.sleep(1)
    process.stdin.write(b'{}\n'.format(i))
    process.stdin.flush()


So this is it. If you run this script, you will see the progress bar updates and reflects the new progress nicely.


Updating Whiptail gauge (Progress bar) with Python


One thing to note here is that you may have seen in many places that they don't recommend to use stdin.write directly due to deadlocks etc, and ask to use communicate(input="") method. But it's not definitely going to work here as the communicate(input="") method is going to write to the stdin and waits for the process to exit. That way we won't be able to keep updating the progress bar. That was from my understanding, but I might be wrong. If you know any better way to do this, or to use communicate(input="") instead of stdin.write(), feel free to leave a comment and let me know.


Bash - Switch STDERR to STDOUT


Bash Switch STDERR to STDOUT

Today I wrote a bash script to create a very simple porcelain client on Git to add and commit files without entering all the git add, commit commands. I personally don't like to use Git clients with GUIs because they are somewhat complex, and I really love working on the terminal and the comfort of typing on my keyboard. But typing all the commands every time when working with Git isn't productive as well. So I decided to create a small client so I can just run it and do all the basic repetitive tasks through it.

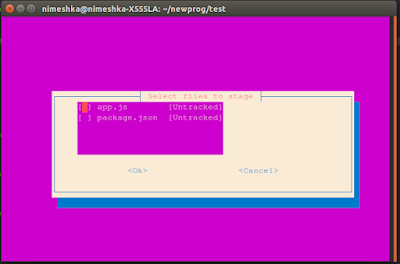
Since I wanted to run it in the terminal and also to reduce the usage of mouse, I used whiptail to generate all the UIs inside the terminal to select files and commit. However, while working with it, I noticed that some components of whiptail, like checklist, for example, uses STDERR to return its output. I have no idea why it prints the output on STRERR, but I wanted it to print to the STDOUT. So here's how to do that redirection.

You just have to add the following at the end of the line you need.

3>&1 1>&2 2>&3
Example:

whiptail --separate-output --title "Select files to add" --checklist " " 10 60 5 '$filelist' 3>&1 1>&2 2>&3

What it does?

Well, I hope you already know what are file descriptors. If not, basically there are three of them,

0 - STDIN
1 - STDOUT
2 - STDERR

in addition to these specific FDs, there are 3-9, and they can be created as we want. In the above line, what we actually do is,

3>&1 = we create a new file descriptor 3, and points it to the STDOUT (& sign is used to refer to another FD, and here we actually create a temporary FD 3 to hold the STDOUT).

1>&2 = Then we redirect the STDOUT to STDERR. We actually needed the above line because we switch it here, and if not for the above, we would lose the reference to STDOUT after the switch.

2>&3 = Now we simply redirect the STDERR to the FD 3 we created, which is currently redirected to the STDOUT.

Now you see that we have switched STDERR to STDOUT and vice versa :) I hope this is clear and will be helpful to someone. I only wanted to write this here so I can refer to it on a later day in case I forget. But if you ever come across this post, don't forget to leave a comment.

Ubuntu touch: Change the created or modified date of a file using terminal.

Ubuntu touch: Change the created, access or modified date of a file using terminal.


Last week I wrote an automation script, which (a part of it) generated some files, and I wanted to store them for a maximum of three days. So along with the script, I wrote another bash script to delete any files which are older than three days, and I set it to run as a cron job.

After writing all the scripts, I wanted to test whether they work. For tests, I needed some files which are at least three days old and useless at the same time because my script will be deleting them.

So how did I do that?

I believe you all know about the touch command. What does it actually do? Well, I'm sure most of us will say "we use it to create a file". It's true. But that's not what touch command does. Its real purpose is to change the access and modification time of a file. It will create a new file only if it doesn't exist ;) So this blog post is about how to do it. I thought of sharing it in my blog for my own reference as well as a help for those who will be looking for it in the future ;)

In the touch's manual page, it says:

Update  the  access  and modification times of each FILE to the current time.

A FILE argument that does not exist is created empty, unless -c  or  -h
is supplied.

A  FILE  argument  string of - is handled specially and causes touch to
change the times of the file associated with standard output.

Mandatory arguments to long options are  mandatory  for  short  options
too.

So, that's it. You just have to add the -d parameter and pass in a timestamp and it will create the file with given date / time. If the file already exists, it will modify the access / created time to the given one. Too easy right? For my specific requirement, the following command was enough for me.

touch -d '4 day ago' test.txt

As you can see, the value given to the -d parameter could be a human friendly syntax like shown above. You can also pass in a timestamp if you wish. Please read the manual page for more information on that.

I hope this will be helpful for someone :)

View and edit files inside a docker container.

How to view and edit files inside a docker container.


Today I deployed a new service in a docker container and found that service wasn't working as expected. Since it was working in my local environment, I guessed that it could be due to a small issue. So I decided to access the files inside the docker container and do some manual debugging. I wanted to write down the command to access the terminal of the container in my blog for my own reference. Hope this will help others too.

So here's how to get into the terminal / bash prompt of your container. Just run the following command.

docker exec -it <your-container-name> bash
That's it. I hope you know that you can get a list of all running instances by giving the docker ps command ;)

One last thing, since I mentioned about editing files. Docker by default, doesn't come with any editors like nano or vim. You may need to install them manually. It's super easy, in case you don't remember, just run:

apt update
apt install vim
Hope it helps :)