Easy setup Streaming Replication for Postgres 9.6 in Ubuntu


Recently I installed Postgresql 9.6 on two Ubuntu servers and configured streaming replication between them. Although there are many articles and guides covering this topic, I noticed that most of them are missing some important steps or they contained wrong information. After the setup was done, I thought I should write it down as a complete, simple guide in my blog for future readers.

Here's the most basic and the simplest way to setup streaming replication in Postgresql 9.6.

On your Master Server
==================

1. First we need to create a user for replication.
su - postgres
psql
CREATE USER replication REPLICATION LOGIN ENCRYPTED PASSWORD '123';

You can list the users with the following command:
\du
Edit the /etc/postgresql/9.6/main/postgresql.conf file and do the following changes.

listen_addresses = '*'
wal_level = replica
max_wal_senders = 5
wal_keep_segments = 32
archive_mode = on
archive_command = 'test ! -f /var/lib/postgresql/9.6/main/archive/%f && cp %p /var/lib/postgresql/9.6/main/archive/%f''

Now we need to edit the pg_hba.conf file and add a record for the standy server so that it can connect to the primary.

host replication replication 192.168.3.169/32 md5
Note: 192.168.3.169 is the IP address of standby server.

Now create a new directory inside of the 'main' directory for the archive configuration - run the below command as postgres user:

mkdir -p /var/lib/postgresql/9.6/main/archive/

On your Standby Server
===================

service postgresql stop
We shall keep a backup of the postgres data directory.

mv /var/lib/postgresql/9.6/main /var/lib/postgresql/9.6/main_backup
Now we should migrate the data dir from the master server using the pg_basebackup tool.

pg_basebackup -h 192.168.4.168 -D /var/lib/postgresql/9.6/main -U replication -v -P
Note: 192.168.4.168 is the IP address of the Master server.

After the base backup is complete, we should create a recovery.conf file.

/var/lib/postgresql/9.6/main/recovery.conf

standby_mode = 'on'
primary_conninfo = 'host=192.168.4.168 port=5432 user=replication password=123'
restore_command = 'cp /var/lib/postgresql/9.6/main/archive/%f %p'
trigger_file = '/tmp/postgresql.trigger'

Switch back to the root user.

exit
Start the Postgres service

service postgresql start
Verification
==========

Now we have finished setting up streaming replication between the two servers. To verify that both servers are working as expected, switch to the postgres user and run the following command in the Master Server.

su - postgres
psql -x -c "select * from pg_stat_replication;"
You should see the client_address property pointed to standy server's IP address and the state as streaming.

Note: I took the above restore and archive commands from the Postgresql documentation here: https://www.postgresql.org/docs/9.6/continuous-archiving.html

That's it. I tried my best to keep it as simple as possible. This is only a basic setup to give you an idea on how to setup streaming replication. For a production environment, you might need to set proper values depending on the requirements.

I hope this post will be helpful for someone :) Don't forget to leave a comment if it helped.

FATAL: the database system is starting up - Postgres Streaming Replication

FATAL: the database system is starting up - Postgres Streaming Replication


I was setting up streaming replication between two Postgresql servers in active passive mode. After the setup was done, I tried to connect to the slave node to see if everything works fine and received the following error:

FATAL:  the database system is starting up

I was thinking for a while before I realized that I didn't set the slave node to hot_standby mode. It seems like a common mistake everyone does, so I thought of writing it down here hoping someone would find it useful.

If you get this error, this is what you have to do:

Open your postgresql.conf file.

vim /etc/postgresql/9.6/main/postgresql.conf
Locate the following

hot_standby = off
and change it as follows:

hot_standby = on

Save the file, then:

service postgresql restart

Now you can query your slave server ;)

Fix gpg: no valid OpenPGP data found error in Ubuntu


Fix gpg: no valid OpenPGP data found error in Ubuntu

Today I was installing Postgres 9.6 in Ubuntu 14 server and while adding the key, I got this error.

gpg: no valid OpenPGP data found error

This is the command I entered:

wget -q -O - https://www.postgresql.org/media/keys/ACCC4CF8.asc | sudo apt-key add -

I tried several solutions and found a way to get past this error. To solve, all you have to do is download the key separately and add it.

Here we basically the run the above in two seperate commands. This is how to do it.

First get the key.

wget https://www.postgresql.org/media/keys/ACCC4CF8.asc

Then add it:

sudo apt-key add ACCC4CF8.asc

That's it. Hope it will help someone ;)

Fix tmux: error while loading shared libraries: libevent-2.0.so - upgrade to Ubuntu 18.04


Fix tmux: error while loading shared libraries: libevent-2.0.so - upgrade to Ubuntu 18.04

I have been using Tmux for some time with Ubuntu 16.04 and it was all working so well until I upgraded my system to Ubuntu 18.04. When I tried to run tmux via the command, it interrupted with an error as shown below:

tmux: error while loading shared libraries: libevent-2.0.so

So I checked a little bit deeper and found the solution to this. It seems like tmux in Ubuntu 18.04 requires the shown version of libevent and since I installed tmux under Ubuntu 16.04, I'm missing it. That's pretty obvious.

You should also note that Tmux comes with all the required libraries in Ubuntu repositories if you use Ubuntu 18.04. So in order to fix it, all you have to do is remove the version of tmux you already have and reinstall it.

First let's remove tmux.

sudo apt purge tmux*
This will remove all tmux related packages from your system. Now if you enter the command tmux in your terminal, you should get a message saying it's not installed. If it still shows the same error, then you have to manually remove tmux.

To see which tmux binary is used in your system, run the following command.

which tmux

It will display the path to tmux. You can remove it manually by running:

sudo rm $(which tmux)

Fine, now tmux is removed from your system. Now let's install it using apt.

sudo apt install tmux

After installing, you can start tmux by entering the tmux command in your terminal. If you get some error saying tmux is not found, then its probably because your system is still using the old path to tmux, which we deleted before.

To verify that, enter the following command.

type tmux

If you get a response something to similar to this :

tmux is hashed (/usr/local/bin/tmux)

Then it means you have to clear the old hash, so it will identify the new tmux path.

You can remove the hash by running the following command.

hash -d tmux

This will remove the hash entry and now if you again try to run tmux, it should work as expected.

I hope this will help somebody :) Feel free to comment and ask any questions.

Set tab width in VIM to 4 spaces or a single tab


Vim by default adds two tabs when you indent something. It also messes up the whole thing if you paste a large code block with tabs into it.

Here's how you can set the tabs to 4 space width, and fix that messing up issue.

Edit your vim config file and add this at the bottom of it.

vim ~/.vimrc

and add the following.

set tabstop=4

Now save and quit. Start vim to see that it now indents your code only by a single tab :)

Convert putty ppk key file to public, private key pair to use in SSH client Ubuntu

Convert putty ppk key file to public, private key pair to use in SSH client Ubuntu


Today, a friend asked me to login to a Linux server and he sent me a PPK file which he uses with his Putty client in Windows. I had to generate a Public / Private key pair from that PPK file in order to use it with my SSH client in Ubuntu. It was really easy and took me only a few minutes. I thought I should post this in my blog so it would be helpful to somebody, and it would also be useful to me as a quick reference in future whenever I need it again.

This is how to convert your PPK file to an OpenSSH keypair.
  1. First, if you don't have putty tools installed in your computer, you have to install it. This will help us when dealing with PPK files.

    sudo apt install putty-tools
  2. Now we can use the puttygen utility to generate an OpenSSH private key from this ppk key file. To do that, run the following command.

    puttygen <your-key-file>.ppk -O private-openssh -o <new-key-file>
    Ex: puttygen key.ppk -O private-openssh -o id_rsa
    Here the -O option stands for "output-type" and it specifies the type of file we want to generate. By giving it as "private-openssh", we tell it to generate an OpenSSH private key file. You can see the manual page by running man puttygen if you want to learn more about the other output types. (But they aren't required now).

  3. Okay, now we have the private key. We can use ssh-keygen to generate the relavent public key for this private key file.

    ssh-keygen -y -f <new-key-file> > <new-key-file>.pub

    Ex: ssh-keygen -y -f id_rsa > id_rsa.pub

    Here the -y and -f options mean the following: (taken from the Manual page)

    -y = This option will read a private OpenSSH format file and print an OpenSSH public key to stdout.
    -f filename = Specifies the filename of the key file.


    I hope it's clear. We are almost done.

  4. Last step is to set the right permissions for the new key pair. Usually, the SSH client expects the Key files to have permission as 400 or 600. So let's set it.

    chmod 400 id_rsa
    chmod 400 id_rsa.pub
    Now we should be able to login to our server using the new key pair we generated.

    ssh -i .ssh/do_server/id_rsa root@xxx.xxx.xxx.xxx

I hope this will be useful to somebody in future :) If this post helped you, don't forget to leave a comment and let me know !

GMAIL Mailbox names for IMAP connections?

GMAIL Mailbox names for IMAP connections

I worked on something interesting today. That was "creating a simple email client for Gmail", using the PHP's built-in IMAP library. I know there is an official PHP library provided by Google for that, and I have even wrote a blog post about it sometime back (explaining about a bug I found in it). But this time I wanted to do it with the Imap library instead.

So soon after finishing the Inbox, I started working on listing the "Sent Items". But to my suprise, I had a bit hard time finding the right mailbox name for the sent items. I assumed a few names like "Sent", "Sent Items", "Sent Messages", but none of them worked. So I turned to Google and did some search, and then I found this page on the Google Developers website.

https://developers.google.com/gmail/imap/

It explains everything about Gmail and the IMAP protocol, and how to actually use IMAP with Gmail. In the IMAP Extensions page, they have listed all the mailbox names and it was just a matter of using the right name.

Here's the list:


a004 LIST "" "*"
* LIST (\HasNoChildren) "/" "INBOX"
* LIST (\Noselect \HasChildren) "/" "[Gmail]"
* LIST (\HasNoChildren \All) "/" "[Gmail]/All Mail"
* LIST (\HasNoChildren \Drafts) "/" "[Gmail]/Drafts"
* LIST (\HasNoChildren \Important) "/" "[Gmail]/Important"
* LIST (\HasNoChildren \Sent) "/" "[Gmail]/Sent Mail"
* LIST (\HasNoChildren \Junk) "/" "[Gmail]/Spam"
* LIST (\HasNoChildren \Flagged) "/" "[Gmail]/Starred"
* LIST (\HasNoChildren \Trash) "/" "[Gmail]/Trash"


https://developers.google.com/gmail/imap/imap-extensions

The mailbox name should be the name you see inside the square brackets. ex: [Gmail]/Sent Mail

Here's how to use it:

$hostname = '{imap.gmail.com:993/imap/ssl}[Gmail]/Sent Mail';

I thought I should post this in my blog, hoping that it would save someone else's time :) Please don't forget to leave a comment if it helped you. :)

Change prompt in Ubuntu terminal - Hide hostname and working directory.

Oftentimes, I use Tmux to split my terminal windows to save time from switching between them. Although that was quite nice and useful, I always had one problem when working inside some directories located deep down my directory hierarchy. That is, whenever I split up my terminal, I'm always left with a small window for each terminal. So when I'm inside the deeper directories, the prompt takes much longer space to show the path and my prompt was always kept at the end of the window. That was really inconvenient.

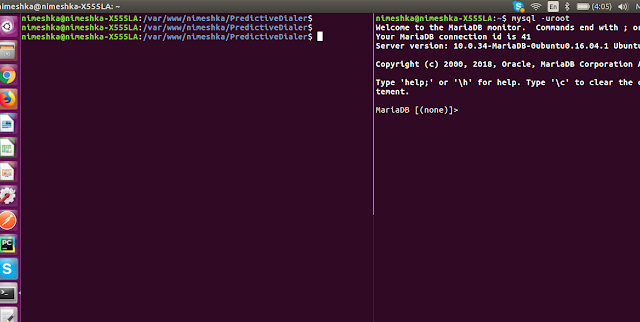
Here's how it looked like:

Change prompt in Ubuntu terminal - Hide hostname and working directory.

I came up with this solution to get rid of that problem. I decided to change my prompt so it would only show my username and current directory instead of the full path. That would make my prompt very shorter and hence I would have enough space to type in my commands and see it all clearly. I was a little bit concerned about this as I still wanted to see my host name whenever I'm connected to a remote server through ssh because I often connect to multiple servers at once so it's important to see which server I'm in before running any commands. Anyway I realized I could make this change available only for my local user account so the usual prompt will be available to me whenever I'm connected to a ssh session.

Here's how to do that.

First edit your .bashrc file in your home directory.

vim ~/.bashrc
Locate the following code block.

if [ "$color_prompt" = yes ]; then
    PS1='${debian_chroot:+($debian_chroot)}\[\033[01;32m\]\u@\h\[\033[00m\]:\[\033[01;34m\]\w\[\033[00m\]\$ '
else
    PS1='${debian_chroot:+($debian_chroot)}\u@\h:\w\$ '
fi

You need to change the PS1 line to change the prompt. By default it is in username@host:workingDirectoryPath format. Here's how I have changed them.

if [ "$color_prompt" = yes ]; then
    PS1='${debian_chroot:+($debian_chroot)}\[\033[01;32m\]\u:\[\033[01;34m\]\W\[\033[00m\]\$ '
else
    PS1='${debian_chroot:+($debian_chroot)}\u@:\W\$ '
fi

If you notice well, you will see that I have removed the h and replaced w with W (which means hostname is removed and the full directory path is replaced by the current directory).

Save the file and quit vim.

Now we need to reload the bash configuration for our current terminal session. Just run the following command to load your new configs.

source ~/.bashrc
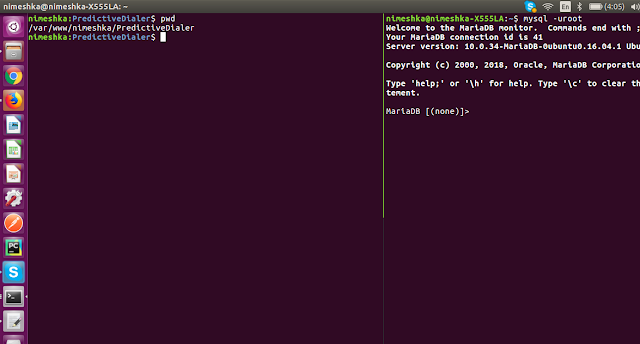
Once you run the above command, you should immidiately notice that your prompt is changed :) But now you won't see the full directory path in your prompt. You can still see it by running the following command.

pwd
Here's how it looks now.

Change prompt in Ubuntu terminal - Hide hostname and working directory.

That's it !! I hope this will be useful to someone. Please feel free to comment and let me know if I have missed anything or if you know a better way to do this.

Maria DB Fix - ERROR 1698 (28000): Access denied for user 'root'@'localhost' on a new installation.

Maria DB Fix - ERROR 1698 (28000): Access denied for user 'root'@'localhost' on a new installation.


Today I installed MariaDB on my laptop and faced this weird issue. After the installation, I tried to login to the DB shell using the user 'root' and the blank password. Then it returned me this error message stating:

ERROR 1698 (28000): Access denied for user 'root'@'localhost'
My first guess was that they might have changed the default password and set it to something else. So I did some research and realized it was not the case here. The actual problem was related to the authentication process of MariaDB.

MariaDB uses a plugin called UNIX_SOCKET to authenticate users, which allows them to use the operting system credentials to login. If I wanted to login to MariaDB using the root user, it first requires me to logged into my system as root (which I can temporarily take access using the sudo command.)

But since I'm logged in as the user nimeshka, I cannot request MariaDB to login as another user (in this case, root). So if I enter the command,

mysql -uroot -p
it would tell me that I have no permissions to login. Why? because I'm authenticated to the Ubuntu system as nimeshka, so MariaDB won't trust me when I ask it to login as root :P So it is clear that if I enter the following command, it would allow me to log in.

sudo mysql
You should also note that If I had created a user in mysql with the username nimeshka, I could have logged in to the shell by just entering the mysql command (it will take my current system username and will log me in as the particular mysql user)

Another thing to note: As I was concerned why I didn't face this issue when I installed MariaDB earlier, I looked for a bit more details in their documentation and found a satisfying answer. It says that they use the UNIX_SOCKET plugin by default in new installations of Ubuntu 15 and later (I used to install MariaDB in Ubuntu 14 earlier and today I tried it in Ubuntu 16, which makes sense!).

So here is how to disable the UNIX_SOCKET plugin for root user.

# First we will login with sudo (means root)
$ sudo mysql -u root

# Then switch to the mysql DB.
MariaDB [(none)]> use mysql

# Then we will update the authentication plugin for root user by running the following query.

MariaDB [(none)]> update user set plugin='' where User='root';

# We need to flush privilages and exit the session.
MariaDB [(none)]> flush privileges;
MariaDB [(none)]> quit


That's it guys, hope this will be useful for someone :)

Hide recent files in Ubuntu Dash search.

By default Ubuntu shows file results and recently accessed files in the dash. Although it's useful, there are times it becomes annoying to the point that you wish if you have an option to disable / hide these files from the dash.

Luckily, it's something very easy to achieve. Here's how to do it.

Just press your super key (Windows key) and type privacy into the dash search box. You will see a result similar to the image shown below. (Icons could be different depending on your theme. However, you need to select the "Security and Privacy" app.


Hide recent files in Ubuntu Dash search.

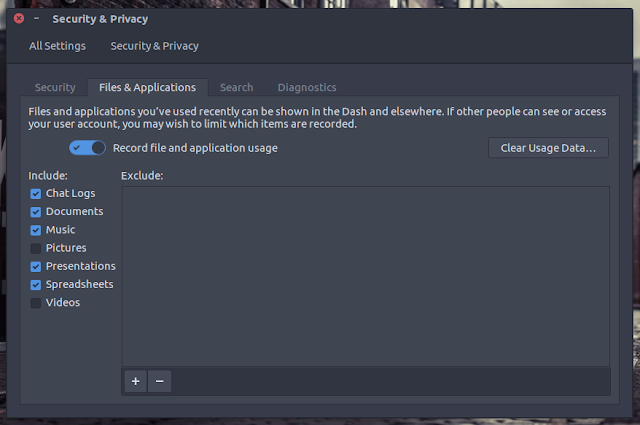
Then once you open it, click on the "Files & Applications" tab (second tab). Here you can disable the "Record file and application usage" option to ask Ubuntu to not remember your actions. If you still want it, and just want to ignore specific file types, you just have to uncheck the file types you want from the list shown below in this window. 


Hide recent files in Ubuntu Dash search.


You can also clear all your recorded usage data so your dash will not have any past data :)

That's it guys. I hope it's clear and helpful. Please don't forget to leave a comment if this was helpful to you!!