How to disable Wordpress plugins manually using database
how to disable wordpress plugins manuallyIf you are working with a Wordpress website, you may always come up with new problems. There is a common problem for most of the wordpress users which is known as “white screen of death” or the blank screen error. When this kind of an error is occurred in a wordpress website, most of the website owners get panic because they don’t have any idea how it happened or how to fix it. So if you would have to face this kind of a scenario, all you have to do is be relaxed, and think how it would have happened. If everything was working fine before, and you suddenly faced this issue, probably it might be due to an error in one of your plugins. One thing you can try is disable all the plugins and try whether the site works normally. This is not the ultimate solution for the White Screen Error, but it may fix the issue most of the times.

Wordpress website owners face many other issues with their plugins. Plugins which were working properly may start to malfunction suddenly and sometimes when the problem becomes worst, the admin login will also be blocked due to the error. So in this article I am going to talk about how you can disable your plugins without accessing your worpdress admin area. I will show you how you can disable all the plugins at once with a simple query, like explained in this article (which inspired me to write this article.) and also I will show you how you can disable a single plugin. (This was not discussed in the above article). Since this single plugin disable method was not discussed in that article, I wanted to write my own and keep the Blog readers updated about the method.

You should keep this page bookmarked because I know you will definitely need this someday :) (If you are using wordpress, or intended to do so in future.)  So keep reading, and come back when you will have to face this issue: D

Let’s start...

What we are going to do here is enter into our Wordpress database, and delete the particular record for plugins so that all the plugins will be disabled. This can be done using any mysql management software, or simply by using the PhpMyAdmin which comes with your Cpanel installation.

First connect to your wordpress database using any of the methods above. Then you have to run the following query to select the plugins which are already installed in your wordpress website.


SELECT * FROM wp_options WHERE option_name = 'active_plugins';
The ‘active_plugins’ field may contain a large string similar to the below, depending on the plugins you have installed.

To make things easy, copy the whole string and paste into a text editor (notepad, notepad++ or whatever you like).

Now, if you want to disable all the plugins you have installed, simply make the ‘active_plugins’ field blank by deleting its content, and save it. 

You don’t need to be scared to delete this value, because deleting the value in this field doesn’t make your plugins disappear forever. They will only be deactivated, and you can re-activate them back by logging into the Wordpress admin area. 

By now, you have successfully deactivated all the plugins manually, and everything should be fine, and you should be able to login into the admin panel if the problem was with one of your plugins.

If you could log in, then it is clear that one or more of your plugins are not working properly, you can find the malfunctioned plugin by re enabling all the plugins one by one.

Now let’s see how you can disable a single plugin using the database. So as I explained above, I have run the query on my Wordpress website, and copied the content in the active_plugins field to here.

This is what I had in my ‘active_plugins’ field. 

a:9:{i:0;s:24:"blog-icons/blogicons.php";i:1;s:45:"bulletproof-security/bulletproof-security.php";i:2;s:23:"digg-digg/digg-digg.php";i:3;s:17:"kayako/kayako.php";i:4;s:19:"pictips/pictips.php";i:5;s:56:"slick-social-share-buttons/dcwp_slick_social_buttons.php";i:6;s:31:"what-the-file/what-the-file.php";i:7;s:41:"wordpress-importer/wordpress-importer.php";i:8;s:24:"wordpress-seo/wp-seo.php";}

To make it more clear, I have rewritten the same in new lines below;

a:9:{
i:0;s:24:"blog-icons/blogicons.php";
i:1;s:45:"bulletproof-security/bulletproof-security.php";
i:2;s:23:"digg-digg/digg-digg.php";
i:3;s:17:"kayako/kayako.php";
i:4;s:19:"pictips/pictips.php";
i:5;s:56:"slick-social-share-buttons/dcwp_slick_social_buttons.php";
i:6;s:31:"what-the-file/what-the-file.php";
i:7;s:41:"wordpress-importer/wordpress-importer.php";
i:8;s:24:"wordpress-seo/wp-seo.php";
}

If you read the above code carefully, you will notice that the number after the letter a:, is the number of plugins I have installed. It is 9 in this case. (You can count the number of lines.) And also, you can understand that each of the lines represents a plugin, and by the name mentioned in it, you can identify what plugin it is.

Suppose I wanted to disable the Worpress Seo plugin. It is the last one in my list. Now I will rewrite the list by removing the SEO plugin from the list as below.

a:8:{
i:0;s:24:"blog-icons/blogicons.php";
i:1;s:45:"bulletproof-security/bulletproof-security.php";
i:2;s:23:"digg-digg/digg-digg.php";
i:3;s:17:"kayako/kayako.php";
i:4;s:19:"pictips/pictips.php";
i:5;s:56:"slick-social-share-buttons/dcwp_slick_social_buttons.php";
i:6;s:31:"what-the-file/what-the-file.php";
i:7;s:41:"wordpress-importer/wordpress-importer.php";
}

I have deleted the last line, which was the line representing the SEO plugin, and also note that I have made the number in the first line to 8, which means one plugin is removed from the total number of plugins I had. Now I will paste this back into active_plugins field and I will save it.

That is it. Now you have learnt how to disable a plugin using the database. If I log back into the admin panel, I will see that the SEO plugin is disabled, and I can enable it anytime if I want. Also you do not need to worry about anything because all the data saved by the plugin will also be preserved.

Please leave your comment or idea about this article because it will be helpful for me to develop this blog.

This article is about how to

Disable Wordpress Plugins manually


People used following queries to reach this article.
how to disable plugin in wordpress database
how to disable plugins in wordpress manually 
how to disable plugin in wordpress database
how to disable plugin in wordpress
how to disable plugin updates in wordpress
how to remove wordpress plugin from database
how to remove wordpress plugin manually
how to remove wordpress plugins


How to add breadcrumbs to a BlogSpot Blog

how to add breadcrumbs in blogger
Today I am going to share the way of adding breadcrumbs to your BlogSpot blog. Before we start, I should make it clear that what I am going to share in this article is not the way how you can add breadcrumb navigation to the blogger blog, but what I am talking about is how you can enable breadcrumbs in your BlogSpot blog, so that Google will show the Blog’s breadcrumbs in Google search results.


What is breadcrumb Navigation?

“Breadcrumbs“ is a special term used in web development to introduce a new type of a navigation method available in modern websites. We know how much it is important to have a well organized navigation system within a website for the usability. People like you and me are looking for fresh and new content all over the internet. Similarly, that is the common purpose of all the other internet users as well. Breadcrumb navigation is introduced as a solution for easy navigation, and also to make a website more structured, so that the visitors will easily understand the content of the website / blog.

As mentioned above, the purpose of the breadcrumb navigation is to categorize the content into general categories, so that each section will contain all the similar content, making it easy for the visitor to navigate in between categories or articles.

how to add breadcrumbs to blogspot

If you noticed the underlined urls in the above image, that is how the breadcrumb navigation appears in your BlogSpot blog.

Though I have specifically mentioned that what I am showing you in this article is not the way of adding the breadcrumb navigation to your BlogSpot blog, this method will automatically implement the navigation inside your blog as well. But then, if you wonder why I have mentioned like that, the reason is simply because it will depend on the template you are using, so I cannot guarantee that it will work as it is. But it should work without any problem unless your template designer has not omitted it from the template.

So coming back to the topic, we were discussing about what breadcrumbs navigation is and how it will appear in your BlogSpot blog. Moving a little further, if you think you should dig more about breadcrumbs navigation, here is the detailed article in Wikipedia for breadcrumbs. if you really want , You can read  it and come back :)

Now, the question,

How to add Breadcrumbs in Blogger?

There is no special option given for adding breadcrumbs navigation to your BlogSpot blog in the blogger’s blog management area. Also there is nothing mentioned about breadcrumbs in the blogger admin panel. Then how to do it? Don’t worry. It is really simple.

Enabling breadcrumbs in BlogSpot blog is not a difficult thing. As I have mentioned above, what breadcrumbs does is that, it categorizes the content of your blog.  If you still haven’t used categories for your blog posts, then you won’t be able to see breadcrumbs yet. So first of all, you have to decide how your blog articles can be categorized. It is very important that you categorize the blog posts in a way so that a category will have articles about that specific category only and nothing else. If you messed up the categories and put your articles here and there without any proper planning, your visitors will face difficulties in the navigation, and also the search engine bots. 

When you are done with the initial planning, you can start adding labels (categorize) to your articles as you selected. Also you should remember to add the proper label every time when adding a new blog post to your blog. (Forgetting to add a label by the time of posting the article doesn’t make any harm. You can always add or change the category by editing the article. )

Follow the steps given below to add / update the label of a blog post in blogger.

01. Go to ‘Posts’ (It is in the navigation bar to the right in the blogger admin area. The second option from top).
02. Then you will see a list of all the articles in your blog.
03. Select the article which you want to update the label / category, and hover the mouse over it. You will see a menu will appear just underneath the article name. Click on ‘edit’ option in the menu which appeared.
04. Then you will be redirected to the edit article page where you will have the options to update the article content.
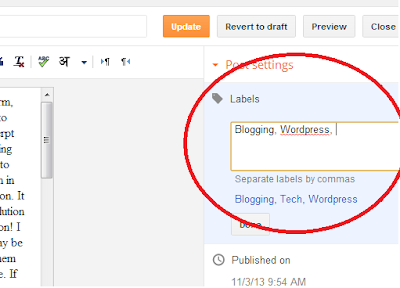
05. On this screen, to your right hand side, you will see an options menu as in the image below.

how to add breadcrumbs in blogger to gain seo advantage

06. There, on very top of available options, you will see an item named as labels.
07. Click on it and it will open you a textbox to edit the label for the blog post you are editing at the moment. 
08. You can type the name of the label you want this article to be included in, and click on done button. Then click on Update / Save button to save the changes.

blogger breadcrumbs navigation

If you have successfully followed the above steps, you will be able to see the breadcrumbs navigation is appearing in your blog now (depending on the template you are using). 

Once you have enabled breadcrumbs navigation in your blog, Google will understand your blog’s navigation structure and it will naturally include the breadcrumbs in the search results. This may take up to a week, depending on the Google bot’s crawl rate of your blog.

And this is how the breadcrumbs appear in Google search results.

Google breadcrumbs in blogger

This is one of the many benefits you are getting by using blogger as your blogging platform, because if you wanted to implement this breadcrumbs search results for a custom website, you will have to do a lot of stuff with adding a whole lot of markup codes to your webpage. But in blogger, all you have to do is just adding a label to your article, and Google will automatically detect breadcrumbs. Even in Wordpress, you cannot implement breadcrumbs this much easier. But luckily, there are many plugins available to do this task without needing to open the scripts to include the codes by you. But still, there is some level of work you need to do in order to get the breadcrumbs to be appearing in Google for a Wordpress blog.

Further Note: If you are wondering why you should add breadcrumbs to your blog, here is my answer.  Having breadcrumbs enabled in your blog will not help you to rank higher in Search Engine Results. But again, in terms of usability, the breadcrumbs navigation makes it easier for visitors and search engine bots to move easily in between different sections of the blog. And as a result, the more and more visitors will come to your blog because they will feel comfortable using it over other blogs. So it is a good idea to add it as soon as possible :)

People used following search terms to find this article.

how to add breadcrumbs in blogger

how to add breadcrumbs to blogspot

how to add breadcrumbs in blogger to gain seo advantage

Online URL Encode Decode

Online URL Encode Decode


Enter the URL to Encode / Decode:


Decode URL or text
Thank you for using our free Online URL Encode Decode Tool.

What is URL Encode?


URL encoding is a simple encryption method which converts the html characters into their special entity codes. Sometimes when you are copying a link from a website or a webpage source, the URLs may me encoded, and if you copy it directly, you may not be able to download a file or visit the URL. But with our new free Online URL Encode Decode Tool, you can easily encode / decode urls within a second.

Why to need to use this Online URL Encode Decode Tool?


There are many free tools there, and it is no special reason to use our URL encode Decode tool. But our encode and decode processes are super fast. You do not need to wait until the page loads to get the Encoded or the Decoded result. Just Copy the URL, Click on Encode Decode button, and you will get the result just in a click of a button.

How our Online URL Encode Decode Tool Works?

Our URL encode decode tool is pretty simple, and we use a client side Javascript Script file to execute your URL inserted, and convert it on the fly.

How to change Excerpt length in Wordpress

change excerpt length wordpressIf you are using Wordpress as your blogging platform, there may be a common and an annoying problem to you. It is the popular question “how to change excerpt length in wordpress”. Yes, that’s why you are reading this :) I have good news for you. You will not have to worry about how you can change the excerpt length in wordpress anymore. Here I have brought the solution. It is super easy. If you are in a hurry, and want the solution immediately, Click here to Jump direct to the solution! I know all my readers will not be the same. Some may be having the problem, and some may not. But all of them are reading this article. So I am writing for everyone. If you are just curious about this Wordpress issue, please keep on reading :) So as I said, sometimes you may never have had this problem before. And you may even have no idea about Wordpress. That’s not a problem. If you want to know what I am talking about, you are also welcome to keep reading.

So, what is Wordpress?


Ok, Wordpress is one of the most popular CMS (Content Management Systems) being used by many web developers to build blogs and websites. Wordpress is so user friendly, that even a person who has no knowledge in Web Development also can easily manage a website by himself / herself.


What is an excerpt? Where the excerpt is located?


Excerpt, by the meaning of the word itself, the excerpt means an extraction of a piece of text from your blog articles. Simply, it is a small selection of the content within your blog post. Excerpts are located in the Blogs page of your Wordpress blog. When you check the blog page of a website, you can see the titles and a small paragraph under each of the titles, with a link to the Full Blog Post. This small paragraph is called the excerpt.


Why you need an excerpt?


Personally I think it is very much important to set up a blog with excerpts. The reason as I am seeing is, a Blog is a place which gets updated frequently with fresh contents. Then it is obvious that many people are visiting the blog to read the articles. If you are displaying the whole article content without excerpts, and you are having 05 blog posts per page, the page is going to be very lengthy, causing the page to load very slower. Besides, the visitors may be interested in different topics, and they may be seeking the right article for them. If so, you are going to lose the readers. Nobody is going to read lengthy articles just to find whether it matches their interest or not. But simply by having a blog post page with excerpts, you can display many number of blog posts in a single page. Also it will reduce the page load time. And also it makes easier for people to find the right article by reading the title and the excerpt only.


What is the problem with the current excerpt length in Wordpress?


If you do not have any problem with the current excerpt length, then everything is OK. But the most common problem people having with the Wordpress excerpt is the length of it. By default, the Wordpress excerpt length is 55 words. Some people find this too lengthy and some finds it is very short. Whatever the condition you are in, you can change the excerpt length as you wish. Being too short, the excerpt makes the page looks emptier. On the other hand, being too lengthy will make it appear more crowded, and it will also make the content unclear for the visitors. So you must be careful when selecting the right excerpt length for your blogs. First experiment with few variant number of words and come to the final value. It will help you to increase your page views as well.


How to change the Wordpress excerpt length?


The only option available at the moment for this is through editing the source code. Wordpress development team has not included an option within the admin backend to change this value. But it is not a problem at all. You can do it yourself. Just Go to your template Options, and Click on Edit Files. Then under that, on the right hand side (most probably) you will see the list of files being used by the template. Scroll down and select “functions.php” file. Click on it so that it will be open in the text box for you to edit. Then simply paste the following code within the functions.php file. And you have done changing the Wordpress excerpt length.

function custom_excerpt_length( $length )
{
 return 20;


add_filter( 'excerpt_length', 'custom_excerpt_length', 999 ); 

Be sure to paste the code as it is, and
then change the values accordingly. All you need to do is change the above ‘20’ value to the number you want. Also make sure you are pasting the code within the php tags.
Warning: It is always advised to get a backup of the files you are editing so that you can replace it with the original file if anything went wrong. In the meantime, it is highly advised to always do the editing of files through FTP. In case you have made any code incorrect, there is a possibility to get the site to halt working. If you are unsure about what you are doing, please seek the advice of a person who knows about using FTP, coding etc. This is for your own good :)
I hope you enjoyed reading the article. Please leave your comments and ideas about this article, whether it was useful, or have you learnt anything from this. Also please add a comment if you need any help in changing the above codes.